Show Posts

This section allows you to view all posts made by this member. Note that you can only see posts made in areas you currently have access to.


Messages - The_Con-Sept

Pages: 1 2 ... 5 Next
1
General THPS(X) / Re: KXTH
« on: October 21, 2018, 10:38:06 pm »
I am sort of here []Black Magic[]. But I have a new computer now that is way more powerful than the one I have sitting collecting dust now. I wanted to make some KOTH levels but now... I just have no time. I am glad to see some people still here.

2
General THPS(X) / Long time no talk
« on: October 21, 2018, 10:33:23 pm »
I know I sort of left this scene a while ago. I was creating a level for THUG pro but I quit in the middle of developing it because some things took off.

First off I would like to mention that I now have become the General manager of the store I work at. So now my life = my store.

I wanted to make a full level for thug pro but I guess I lost interest in it.

I now have a much better computer to do things with but I am wondering if anyone has seen this yet:

https://gfycat.com/TintedPitifulAustralianfreshwatercrocodile

This user claims he is making his own skating game similar to the tony hawk franchise. And it looks like it works the same way too. Of course he is still making this game happen but I am wondering if they will be launching this on steam.

This got me back to thinking about coming back here but I just don't have as much time as I used to. Back two years ago I was working 40 hours a week. but  now I am forever set on 50 hours a week. And it seems like I will never ever have a day off for the rest of my life. I am always solving problems here and I know I am at least a good level designer. but I have not been able to even create a single music track in over a year!

I have no time. But I wanted to check up on everything here and I noticed that you are still alive, I just have more money than time now to devote to even begin making levels.

I was wondering when you guys were going to figure out how to allow larger levels to be played online with THUG Pro.

Because my level office Life will probably never make it out seeing how I just have no time. Even when I begin to play games all I have time for is to play them instead of making them now. I wish I could win the lottery. That way I could just devote myself to creating things instead of having to be at work 24 flippin 7.

So if you guys need funds for something let me know. I'd rather spend my money on a project worth putting into than waiting for the world to change. But only if this money is going towards creating more rather than just letting it sit in a vat so to speak.

Let me know what you guys are planning to do.  I'd love to see THUGPro come out as its own thing instead of having to rely on modifications to the engine.

I guess I miss this game so much I wish I could go back to 2002 and re live those years.

3
Whatever / Re: Anyone still thinking of that possible new tony hawk game?
« on: November 09, 2017, 04:41:18 pm »
I am currently learning C# and the .NET framework. And have picked Unity 3D as my engine.

I am going to be creating my own arcade based skating game. Since Activision no longer cares about the Tony Hawk franchise. I will be creating a skate based game in unity 3D maybe four or five years from now. because I am deeply saddened by what THPS5 became (With overwhelmingly negative views because GRAPHICS GRAPHICS GRAPHICS. graphics can suck my left nut. So do not expect amazing graphics.)

The THUG Pro engine is cool and all, but we are working on some old technology that is not supported for new platforms.

And do not expect the game to feature pro skaters at all. Because the name of the game is going to be:

Robot Skitchers.

because when they fall down... sparks go flying everywhere.

Just expect this game to take arcade skating games to a whole new level.

I also can not promise this game will ever see the light of day. but because EA Skate only causes more stress on the gamer, and THPS5 was such a let down for me... I am taking it upon myself to create my own skating game. One that will bring back the "King of the Hill" mode I miss so much.

Oh and don't worry, "Graffiti" and "trick attack" will still be there for the "stylists" and the "high scores" lists. I am making the skating game with the king of the hill mode everyone hates so much because they do not understand how that game mode works.

Don't expect a story mode either.

4
Questions & Tutorials / Re: Custom Skaters: From blender to THUG 2
« on: August 22, 2017, 08:31:41 pm »
Just a little heads-up to the OP (The_Con-Sept)


The images on the tutorial aren't showing up.
This shows up instead.


Yeah I just noticed this myself.

If you click the picture it doesn't help either.

I'm at a bar right now so there is not much I can do. Unless sk8ace wants to setup a place for me on this site to allow pictures to be seen.

5
Create-A- / Re: Raptor Skater
« on: June 06, 2017, 04:13:57 am »
Splinks... you got a DL Link? if you have one I'll add it to the top post along with mine.

6
==================================

DOUBLE TAP- I mean DOUBLE CHECK YOUR T-POSE!

Now this is where you need to export your model into an OBJ file, and then import it into the weight transfer skater model from the " Custom Skaters: From Blender to THUG 2" post I made before.

Post number 2 in this topic: http://thpsx.com/forums/index.php?topic=555.0

Check to see if your model is close to the t-pose in that weight transfer skater file. If it is at least touching the right parts in the right places... then you should be fine:


And remember... your t-pose may not be perfect, but try to make it as close as you can!

This takes up so much time..... That is why finding something in a T-Pose is just that much faster. The more contorted the model is, the harder it is to get it into a T-Pose!

7
==========================================

PHASE TWO

Now we need to move these vertices into a T-POSE!

So.... After everything has been grouped correctly, start with straightening out the spine. ALWAYS START WITH THE SPINE!


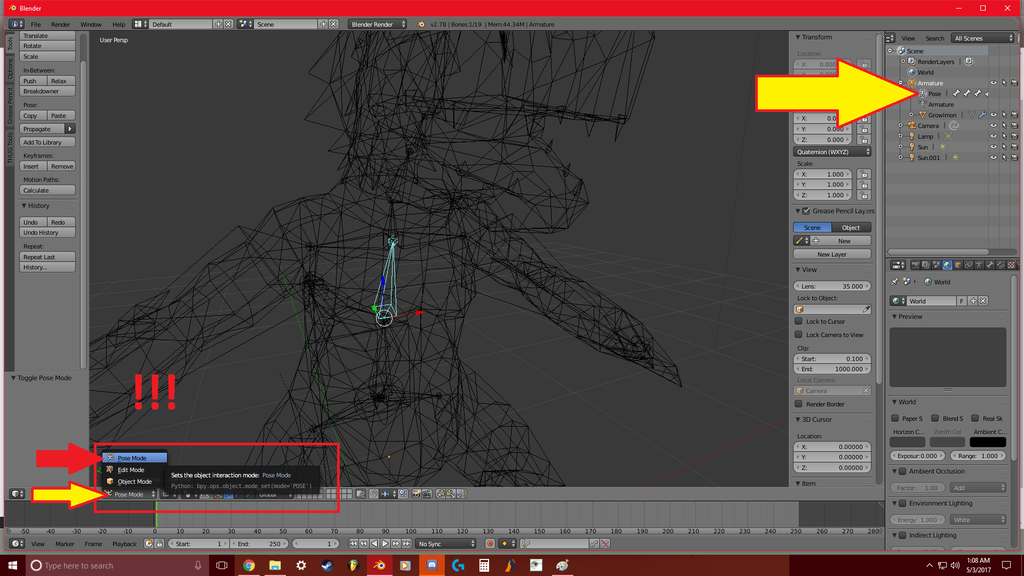
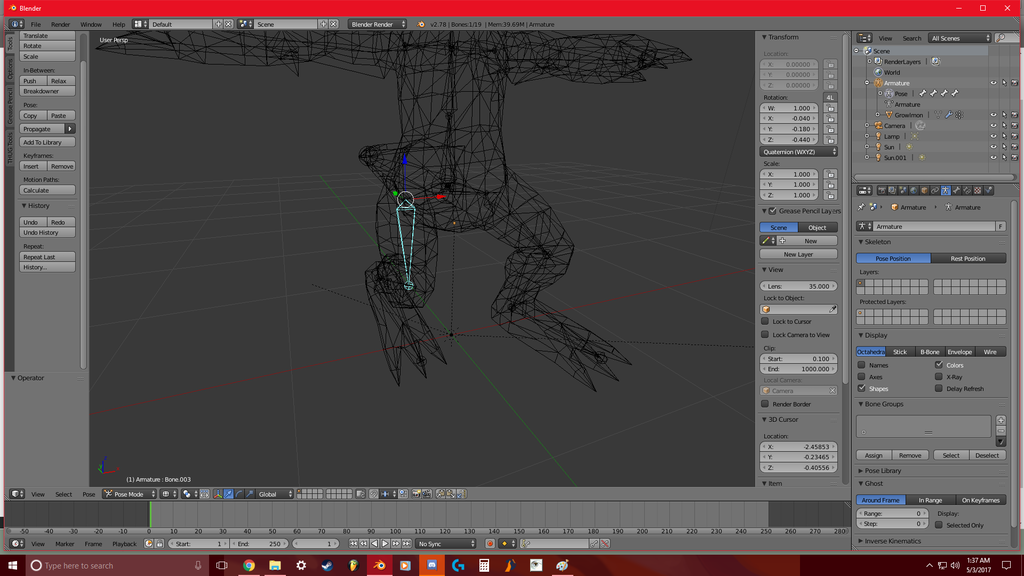
Select your Armature, and then go into POSE MODE. Then select a bone AND ROTATE THEM. This will keep every other bone in a static position while you edit them one at a time. I have it a bit easy in my model for the arms because... well... they only need to have a Z edit really.

To get your model in a perfect T pose? It is impossible. And there is no automatic script to tell your armature to make a T-Pose. So do your best to get it as perfect as possible.

This is where you will probably spend the most time going back and forth trying to make sure everything is perfect. This is how my Raptor Skater went... I kept getting the arms incorrect. But for this growlmon Model.... the legs??? Like I said this might pose a huge problem.

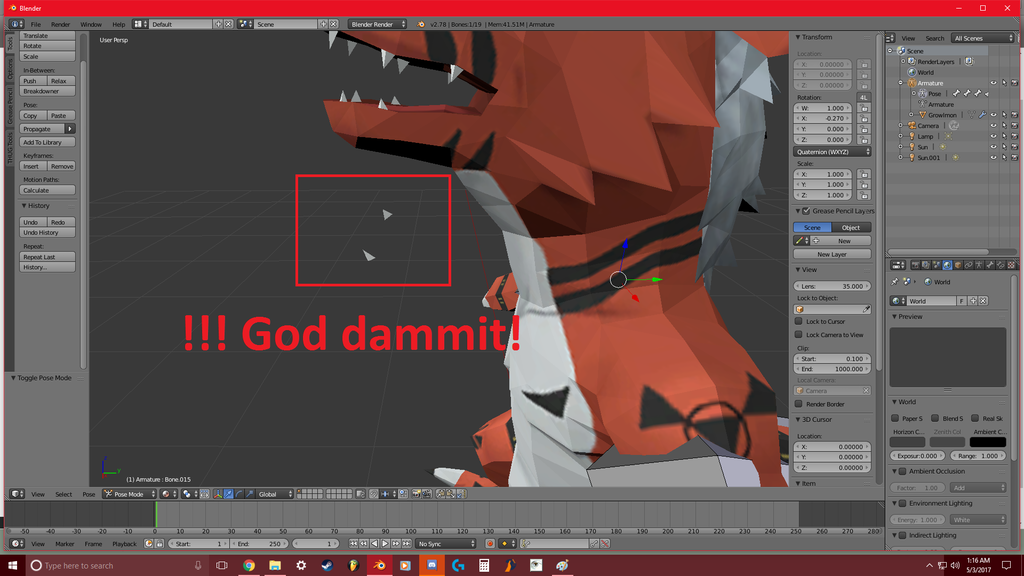
but I am having a different problem right now with the teeth. Apparently 2 teeth are not moving with the rest of the head!


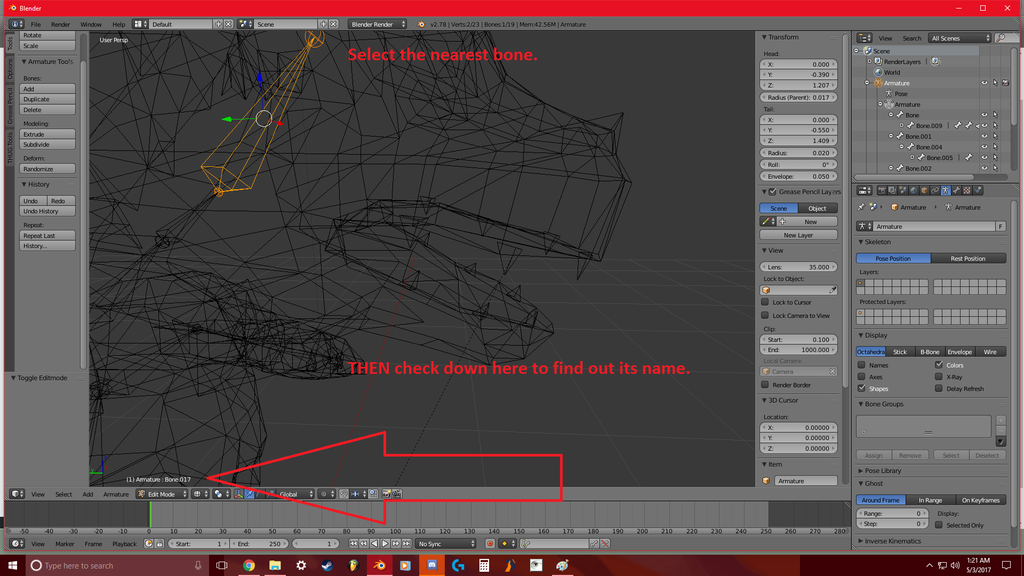
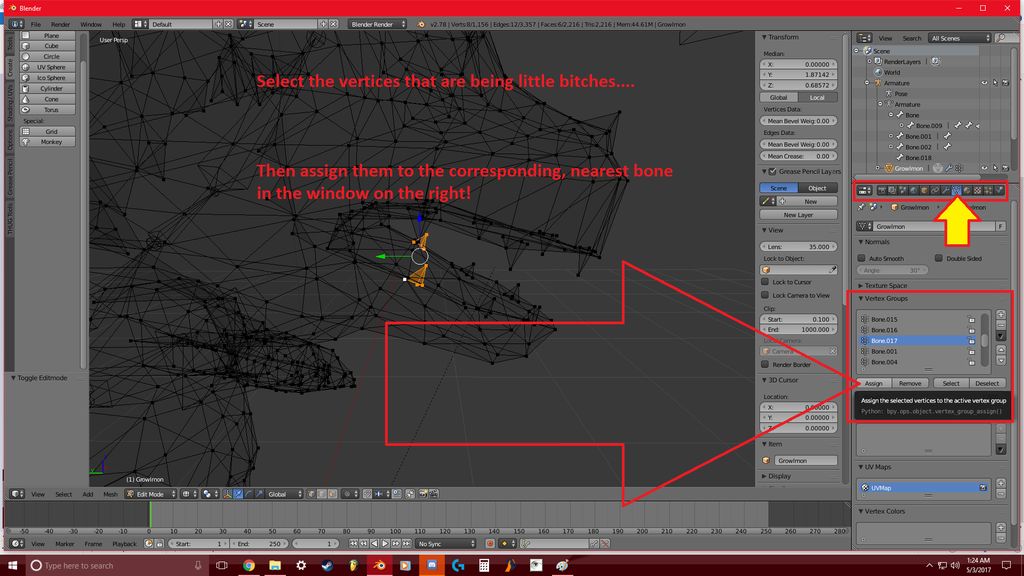
This requires you to add them to a bone. And before you add them to a bone..... YOU HAVE TO START ALL OVER AGAIN WITH THE POSE! That is why sometimes it is best to sort of wiggle all of the bones, 1 by 1, to make sure they are moving all of the vertices correctly. If one vertex isn't doing things properly... you need to go back into edit mode, find the nearest bone that it should be attached to, and then select the vertex, or vertices, and assign them to the correct bone in the vertex group options as shown in the next two pictures!


Now as I said before... editing a model into a T-Pose, from a pose such as this, can be very frustrating. But it is because you are only allowed to rotate bones on one axis at a time. So it is not as simple as rotating 1 axis. Sometimes you have to mess with two of them, or sometimes three of them in order for the pose to look correct.

So finding a model that is already in a T-Pose is like love from the creator. Because this takes for ever to get correct!


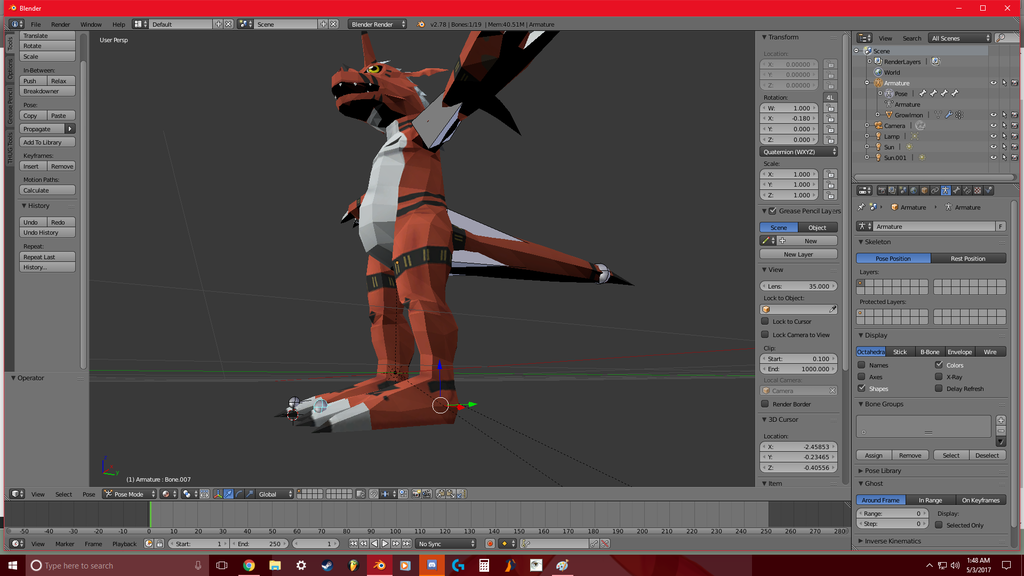
Now after fidgeting around with the damn rotations... I was able to get Growlmon into an ACCEPTABLE T-Pose....


Look at the knees. I did the best that I could!


now... SAVE YOUR PROGRESS NOW! At least you should save at certain intervals so that you can quickly go back and fix an error. But in my case I only ran into a few problems.

Now it is time for the next phase.

8
Alright... so you have a model that you want to import into THUG Pro... But the model is not in a T-Pose.... And it doesn't have an Armature. (the number one thing used to quickly manipulate object vertices on the fly.) if your model has an Armature, or Bones, then skip to the next Phase.

if you don't know what an armature is? Then start below here.

PHASE 1
=============================================

So. You have Blender. (The version I am using is Blender V2.78C.)

Open it up.

And I am assuming you know how to import objects....

So go ahead and import the object and have it sitting in front of you. If it has multiple objects (because of hair physics/ back pack/ awesome looking hat) That is just fine. You will still be able to move them in the armature correctly. Just know that how ever you deform the model, it might mess up because some vertices may be connected to the wrong bone. And I will show you how to fix that.


So everyone knows I like importing hard to do skaters. (Mainly dinosaurs, Digimon, Weird stuff.)

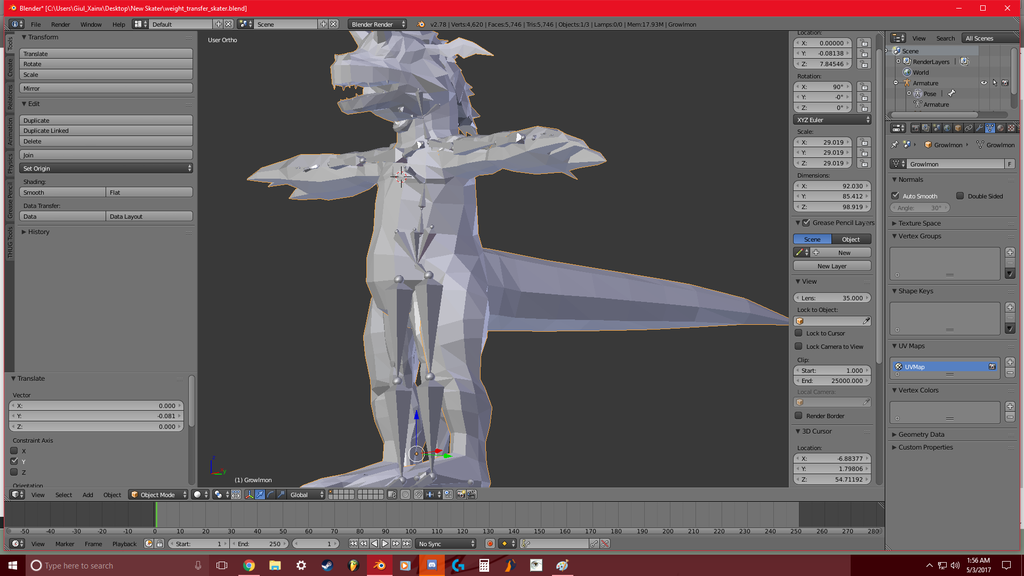
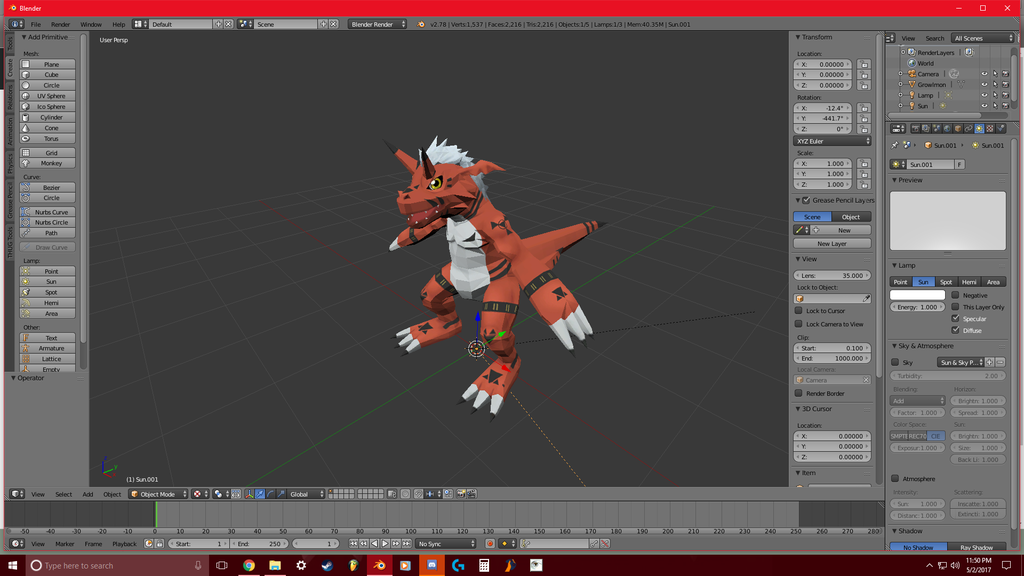
So today I am showing you how to get a Growlmon model that is not in a T-Pose, into a T-Pose!


Look at this! This one looks difficult! Holy **** Con-Sept! How long will this one take you????


Not long at all actually. It takes me longer to create these tutorials than to do things myself.

So. GO INTO WIRE FRAME MODE!

(Side note... Sometimes your model may appear to have no eyes... or UV maps messed up... Sometimes they are actually hidden behind eyelids, or something like that of the sort. So different game engines use different methods of blinking or movement... You might want to check your model in Material mode just to make sure everything looks ok.)

First before we begin... Almost every single model that I come across has several "duplicated vertices" sitting on top of each other. So hit A on your keyboard and have all of the vertices selected. Then hit Space bar and type in "Remove doubles," and then hit enter. On the top it should say "Removed X amount of vertices"

Then you need to add your first bone. I recommend starting with the spine (Middle of entire skater) so that you can quickly get a good sense of how models are rigged up to be animated.

What you want to do is try your best to position this bone in the absolute center of all of the vertices inside of your model.

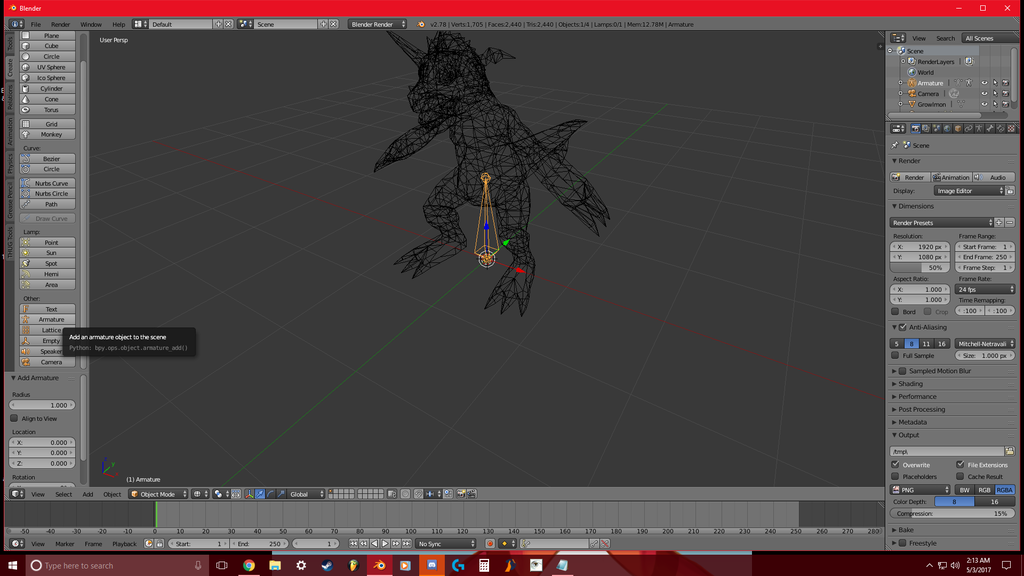
So create a bone by selecting your model (make sure it is yellow) and go into the create bar on the left and hit the little option that says "Armature."


"OMG Con-Sept! I am reporting you for posting NSFW content!"


Relax... you have to move that bone up into the spine..... (hahahahahaha!)

"god daamit consept.. you just made it XXX rated...."

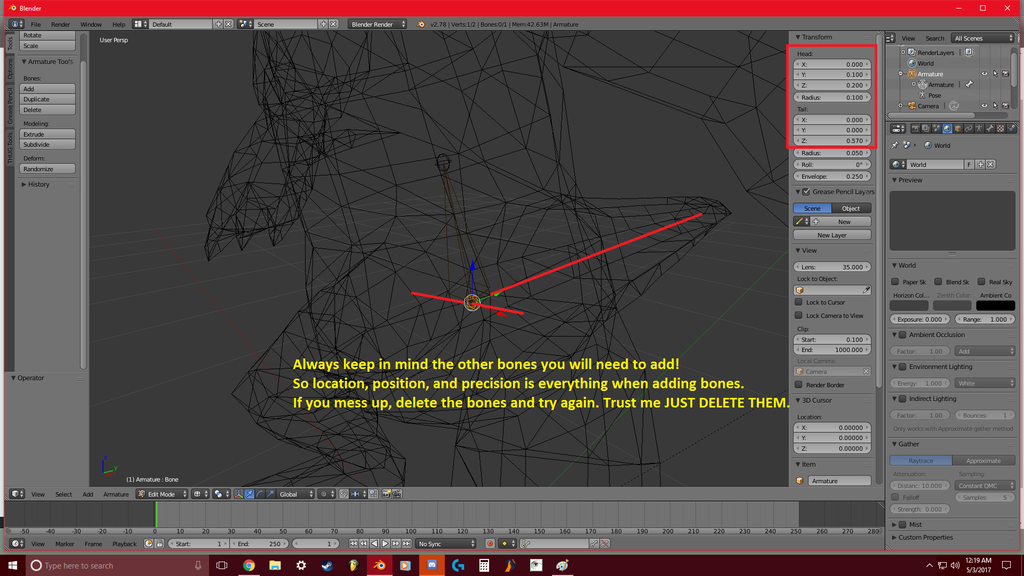
Ok. You do that by editing it's current location in the transformation box. - (if you are not seeing that little panel on the right side, look for a little tiny + Sign located in the 3D plane space window along the edge of the right side. You should click that little plus to bring it up.)

In the next picture I don't have a red box to help you locate it, but you can see it on the right side... Just edit its Z value upward.

(Sometimes you might not have a model that is sitting at an XYZ value of 0,0.0 So you need to just move the bone into the correct place. That is why selecting your model first, and then selecting the add armature button makes it quicker to get that bone right in the middle.)


Now we have the next problem where people might get stuck....

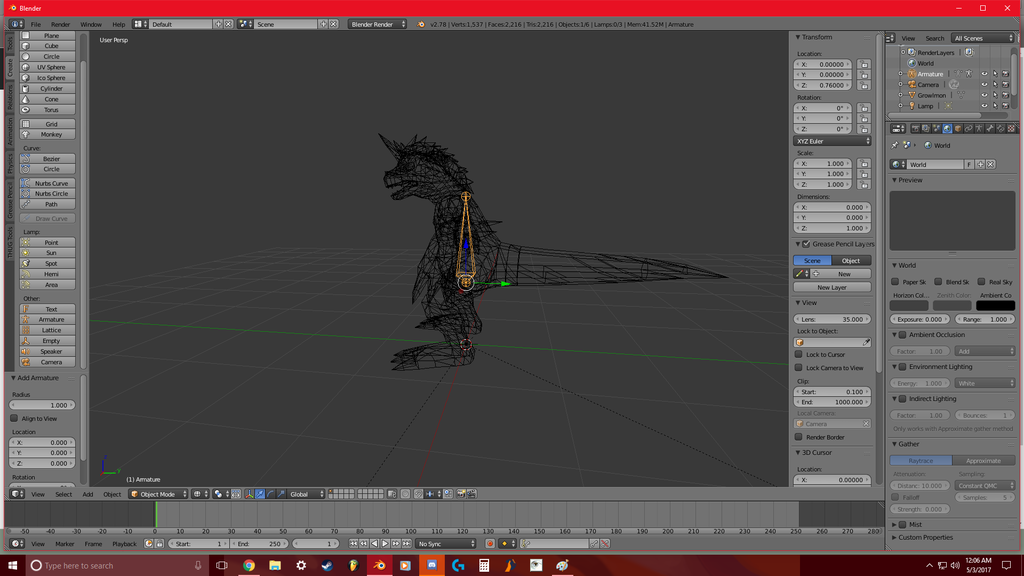
The bone is TOO BIG and NOT AT THE RIGHT ANGLE..... (God dammit Con-Sept.... why are you narrating a gay porno?)

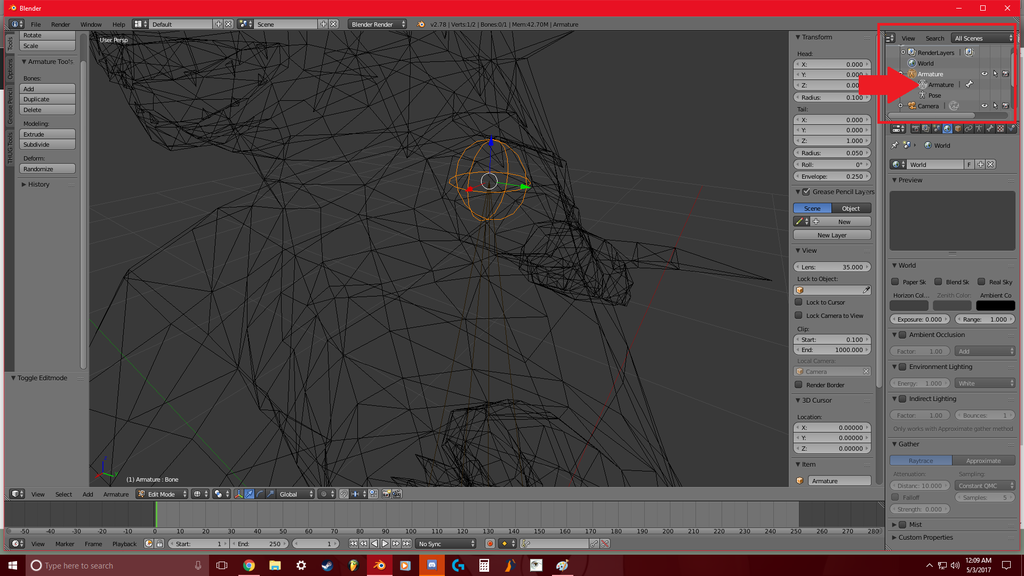
So we need to get it corrected in two ways. First we need to SIZE IT DOWN.... Do so by selecting the armature object string located in the top right window and select the bone itself. You should see the armature suddenly select a spherical little object like so:


Now when you look at the object transform panel on the right, it says THE HEAD... and the tail.... If you move one value and it doesn't move the sphere you have selected, then try moving the other one. Both of them can be quickly manipulated this way.

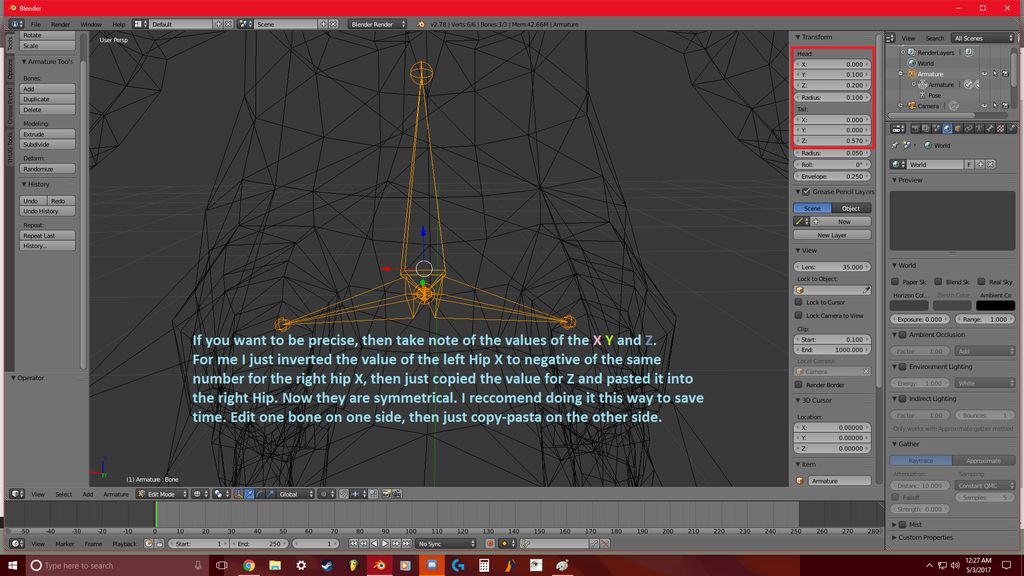
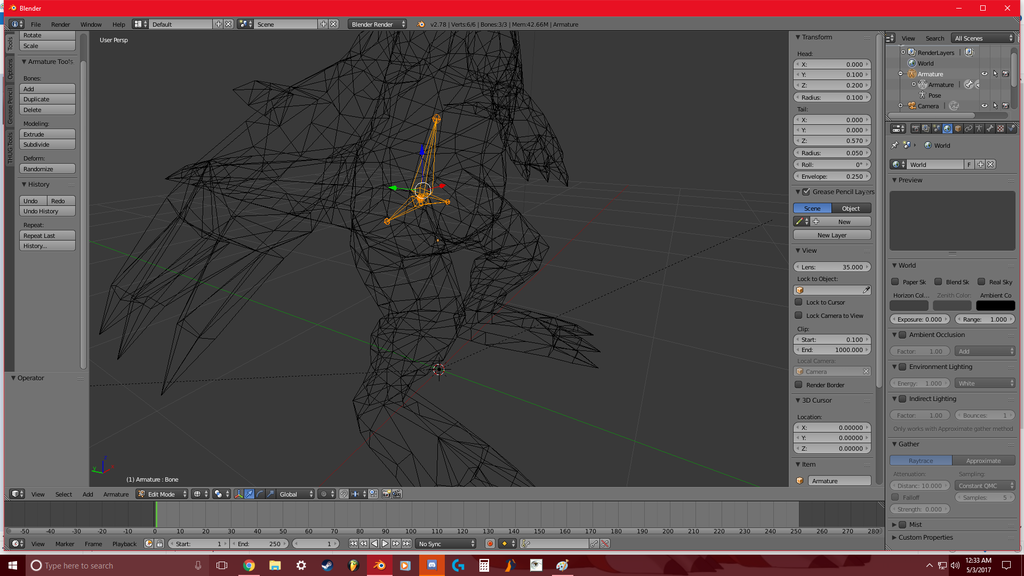
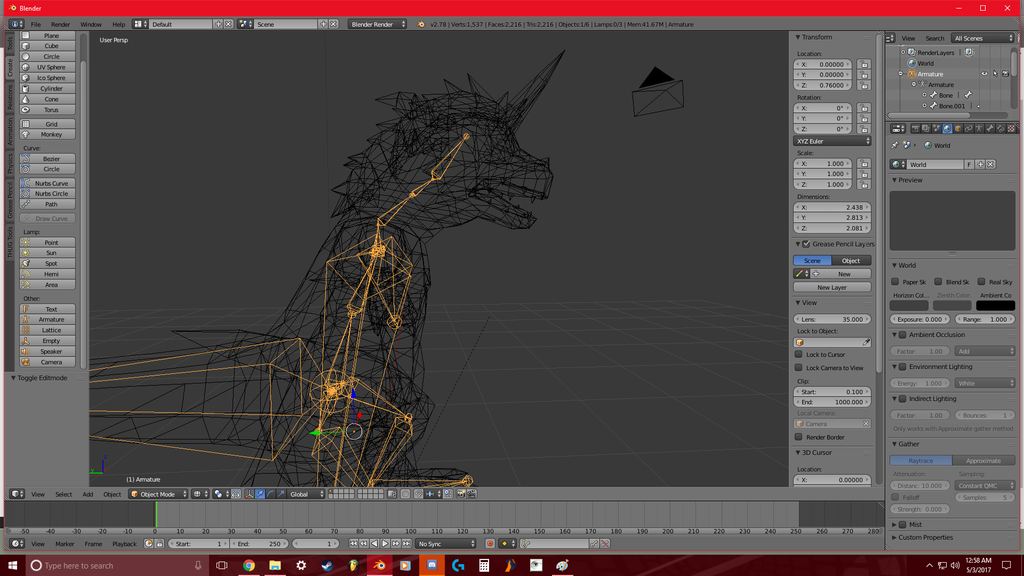
Now when moving the little spheres inside of the mesh please keep in mind all of the other bones you may need to extrude from either side to connect the hips, the legs, the arms... the neck... the head... ALL of those bones.... So here I have it set up so I can quickly  extrude the leg bones, and the tail bone. And I don't have to mess with too many other settings.


Always make sure you have a good location for your next extruded bone.


As explained in the picture, edit one side of one bone for the left... or the right if you are like that... Then just copy certain X, Y, or Z values to quickly mirror the other bone. A lot of other people like to have a mirror effect happen when they extrude. but sometimes you may actually come across a different problem where the model isn't exactly at perfect angle. maybe the pose is that of a statue... So that means your rigging will be harder. But I am a bit masochistic. I like hard things. This model I consider to be intermediate. Give me a challenge! hahahahaha!

And besides, sometimes doing things with the mirror effect might create some interesting unexplained artifacts or extra bones. Or sometimes makes it disjointed. So I do everything by hand.


Now this is where things can get very interesting later on. This model has a bit of a twist to it. a 45 degree angle twist to it. It may cause a problem later on, but for now I am going to ignore that. We just need to get the bones in place.


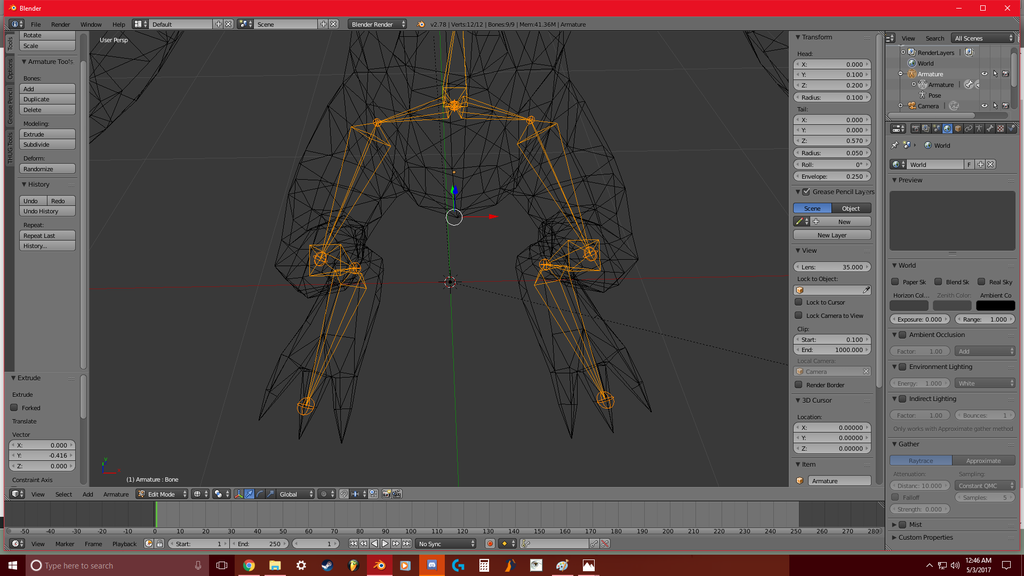
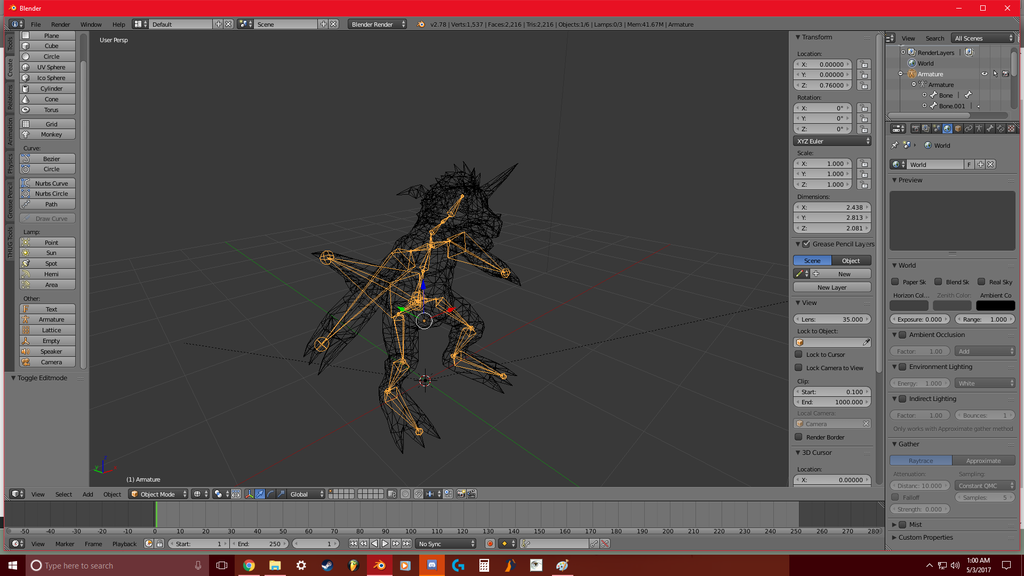
When it comes to Growlmon's feet, he has toes that stick WAY out... And they sort of fan out as well. Just make the bone go a little bit outside of the model's base foot. but not too far. if you have a model like this growlmon you don't have to make a bone for each toe. Just skip that... We will get to it in a minute.

Get the rest of the model rigged up and have it look like this first. And make sure the bones are inside of the model.


When it comes to growlmon's head... it is hunched over his body.... Notice how there are a few extra bones in his neck? That is because I need to straighten him out a bit in the neck in order for this to work... Otherwise he will be looking upwards when I get him into the T-Pose. Just sort of think about how levers work when they have something covering them that stay in a certain position.


Now that your model has an armature structure inside of him... It is now time to do what ASDF said in the other tutorial... Which is Step 6.

Quote
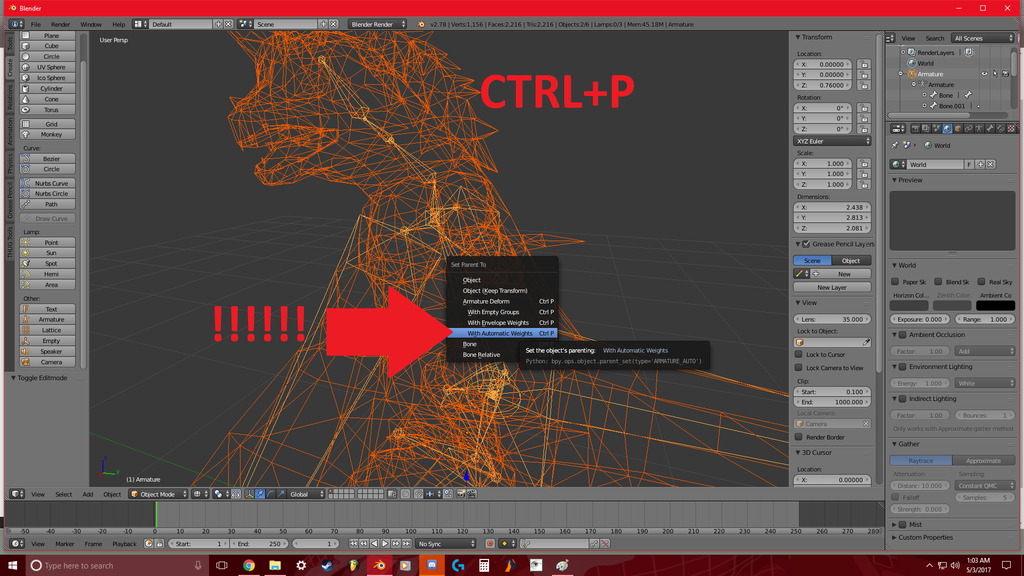
6. in object mode, select your model, then the armature. press ctrl-p and select armature deform.

Now since we are not doing a weight transfer to a skater model yet, we actually have to do something different here. When the menu box opens we actually need to add vertices to certain groups for the bones to manipulate. So instead we select:  Armature Deform->WITH Automatic Weights!


Now we go onto the next phase....

9
Create-A- / Re: Raptor Skater
« on: May 02, 2017, 02:18:05 am »
You could actually take the exported raptor skater, import it into blender with the weight transfer stuff again... and save them as separate custome skater parts. So you could be a hybrid raptor human skater...

10
Questions & Tutorials / Re: Custom Skaters: From blender to THUG 2
« on: May 02, 2017, 02:15:00 am »
if your model is not in a t-pose, then you need to add an armature to them (the best that you can) and then deforming the model, the best you can, into a T-Pose.

That is what I had to do with the raptor skater. I had to create an armature inside of the model (in wire frame mode). You know doing the arms, the hands... the neck... the legs... the spine.... All of that shit. You have to go in and do it yourself. it is easy to create the armature bits, but its extremely difficult to get it into a perfect T Pose. Just get it as close as you can to a perfect t-pose, and export the model as an OBJ file. Then follow this tutorial.

11
Questions & Tutorials / Re: Problem with custom music
« on: April 27, 2017, 05:40:10 pm »
Or... you could just make it easy and.... listen to your tunes on your pc.... and just MUTE the music from the game....

12
Questions & Tutorials / Re: Custom Skaters: From blender to THUG 2
« on: April 27, 2017, 08:06:15 am »
********If you already have a skater model then start here. BUT! if your skater model is not in a T-Pose? see this post before continuing this step:
http://thpsx.com/forums/index.php?topic=560.0
**********


==============================================
WEIGHT TRANSFER YOUR MODEL.

Next tool you will need is this tool. if you haven't already downloaded the thug tools for blender, go back up to the top and GET THOSE FILES BEFORE THIS STEP. if you haven't done so already....

This tool will help you quickly get your model into the game. (Instead of doing it the hard way.... You may end up doing it the hard way if you have a special character like my raptor skater.)

Weight_transfer_skater.blend
https://mega.nz/#!IT5C1ITZ!WN-1dcP3shOTbR7a4zqrjw_i1eXk8n11qFKKqFxhz5w

Now in the words of ASDF:

Quote
To make a character model using a weight transfer blend:
1. load the weight transfer blend
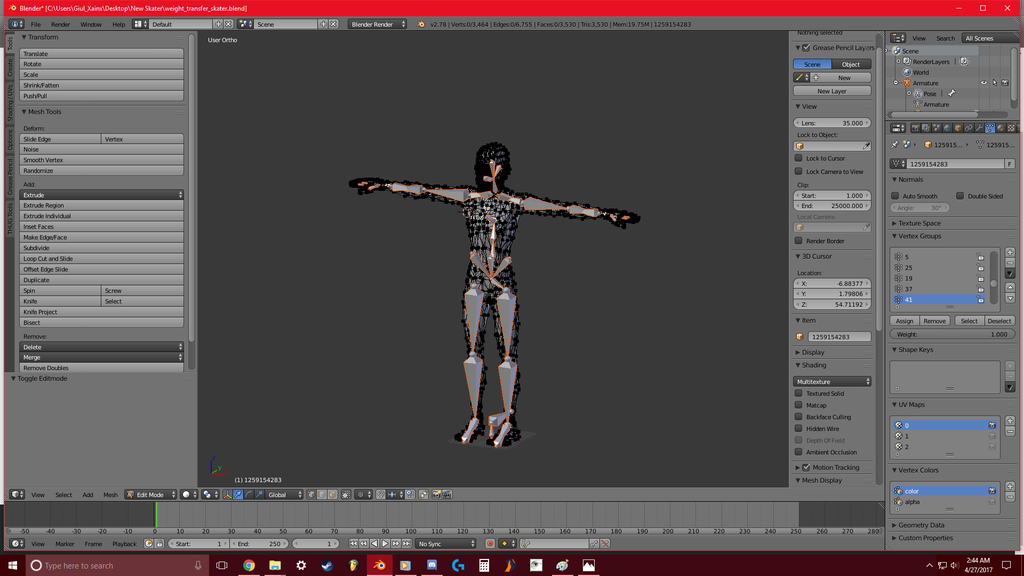


2. load your model
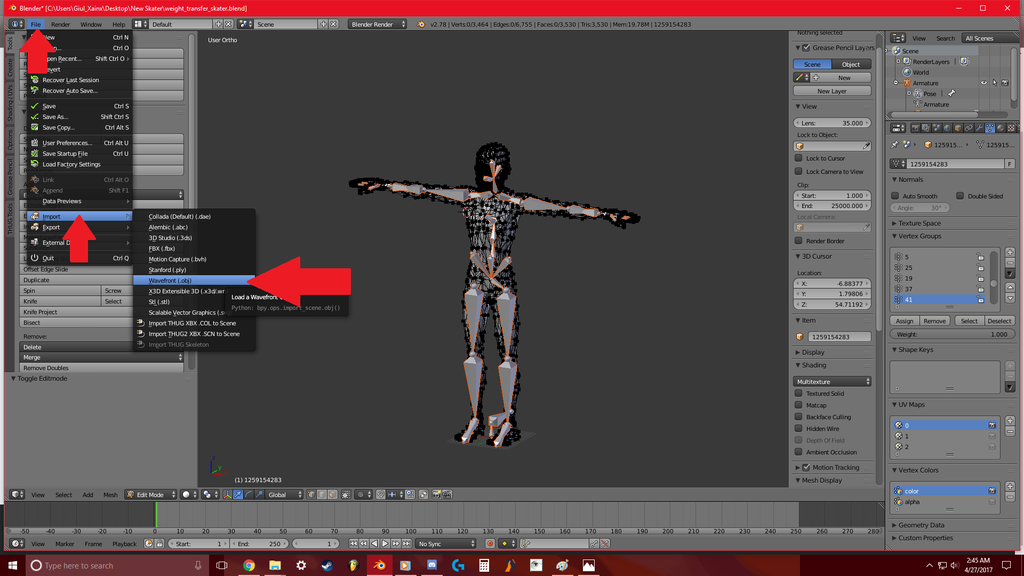


Sometimes when you port a model into this file... your model will be facing a different direction...

EASY FIX!

Just select your model and go up into the edit tools and hit "Rotate."
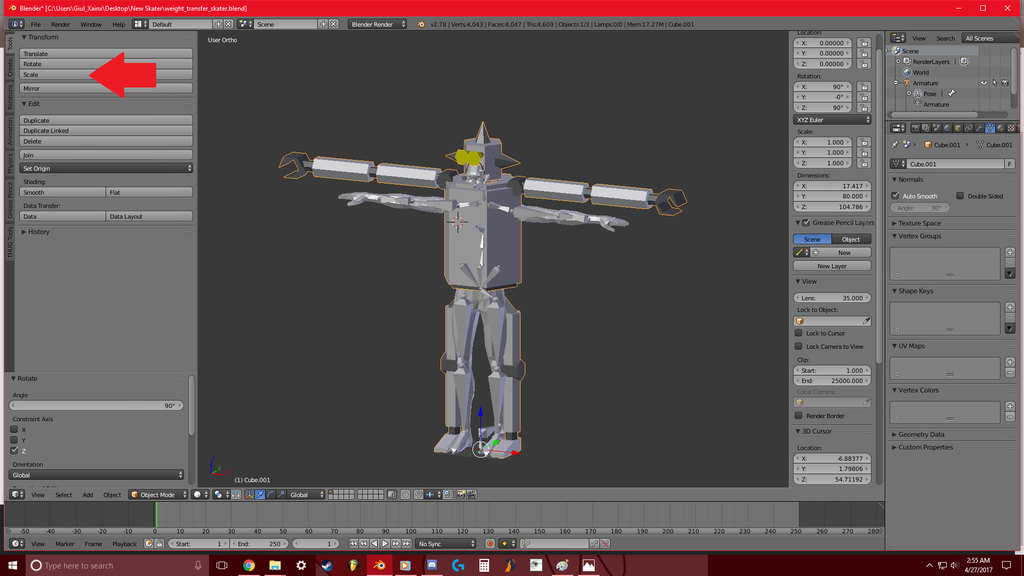


The greatest thing about 3D editors is you can quickly enter in a few things on your keyboard after you hit "rotate" and you can hit Z to rotate the entire model on its Z axis. Then you can type in a number like 45 (to turn it 1/8th) or 90 (to turn it 1/4th) or 180 (to turn it 1/2) to turn it that many DEGREES in a certain direction. if you need to quickly turn it the other way around use the - and + keys on the numpad to make it turn the same amount of degrees from its original position to the other direction.

Now you can see the next problem I have with my model... it is the overall SIZE of the model... it goes outside of the skater!


You need to SCALE IT DOWN baby. It will automatically SHRINK the entire model to fit within the skater....

But in my case.... The model is not perfectly fit into the skater.... WHICH MEANS some manual edits need to be made! I will get to that in a minute.... Even if you have this problem yourself, just save it for later. Right now you need to get everything set up before you do any manual edits! So don't worry. just keep going! This is how my raptor skater model went!
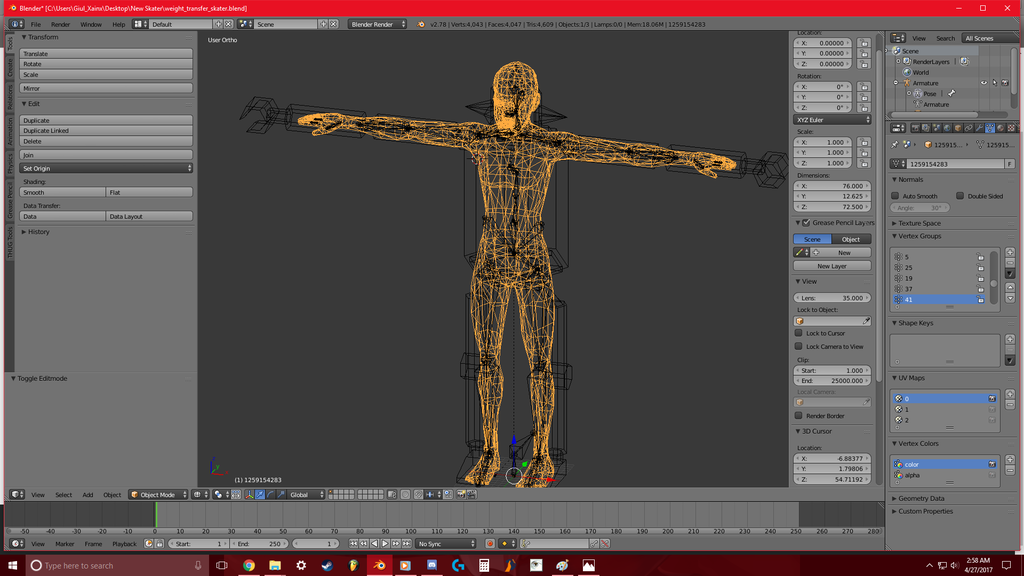


Quote
3. poisition your model so that every joint in it overlaps with the joints on the source (ie the model that the weight will be transferred from) model.


4. select the target model(s) first, then the source model.
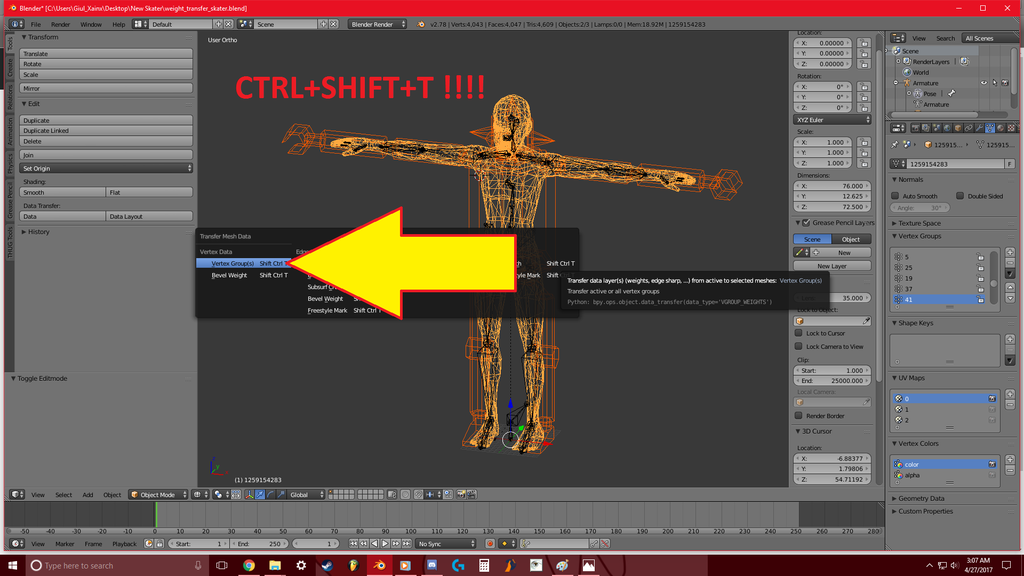
press ctrl+shift+t and select the vertex groups option.

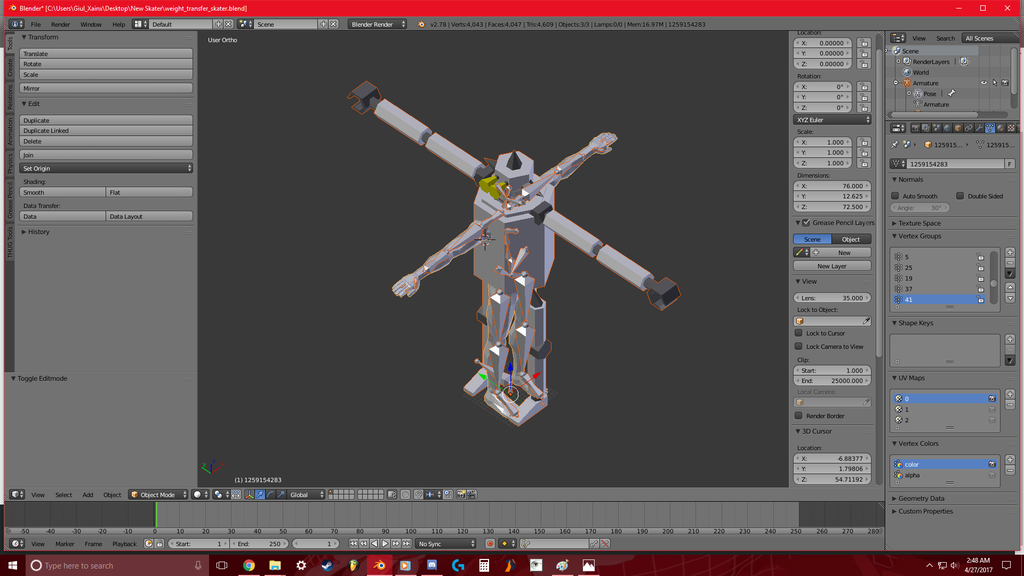
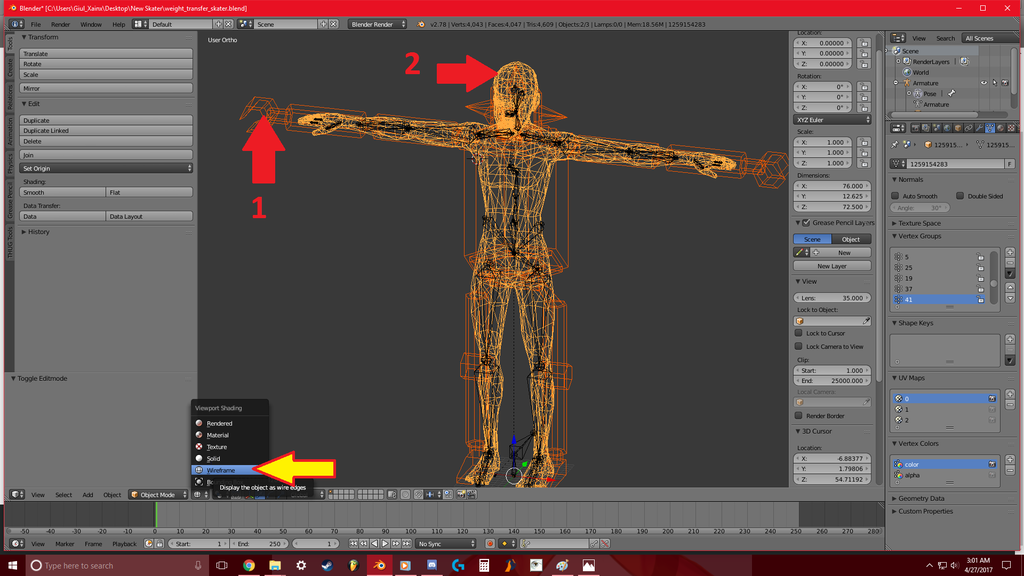
Before doing this step... I recommend going into "WIRE FRAME" mode first! (Yellow arrow shows where that mode is quickly located in EDIT MODE.

The target model (red in my picture) is the model you created/going to port. The source model (Yellow vertices) is the model that needs to be selected second. its that bald dude you saw at the beginning.


Now the CTRL+SHIFT+T and vertex groups function!


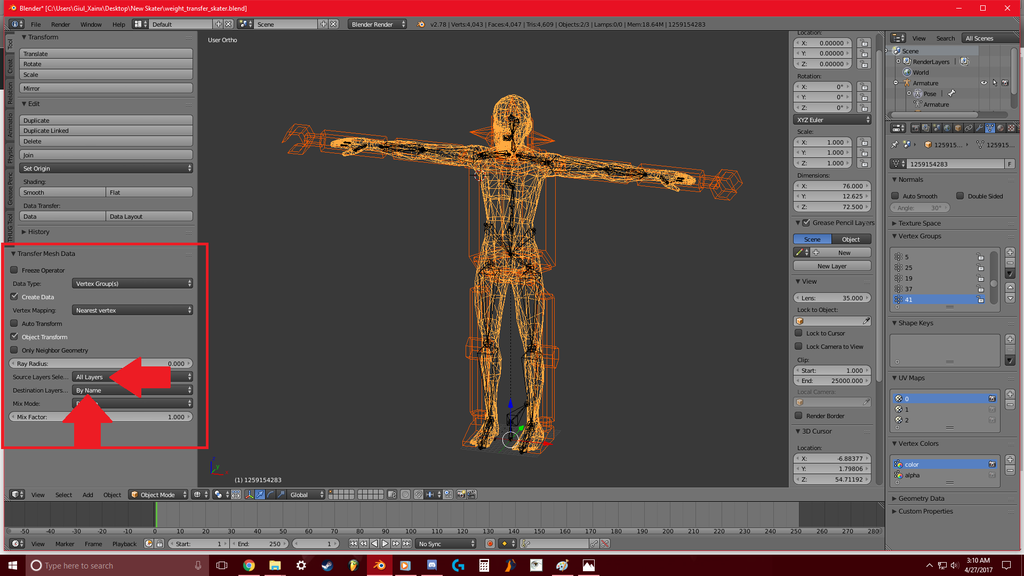
Quote
in the operator settings set source layers selection to ALL LAYERS and destination layers to BY NAME


5. if you have done the above correctly you a bunch of vertex groups should appear in your character models vertex groups tab.

before you go any further... you need to delete the source model now. BUT BEFORE YOU SAVE ANYTHING>> Make sure you save this as a new blender file!!!!!!! Make sure to add "weighted" into the blender file for fast reference!
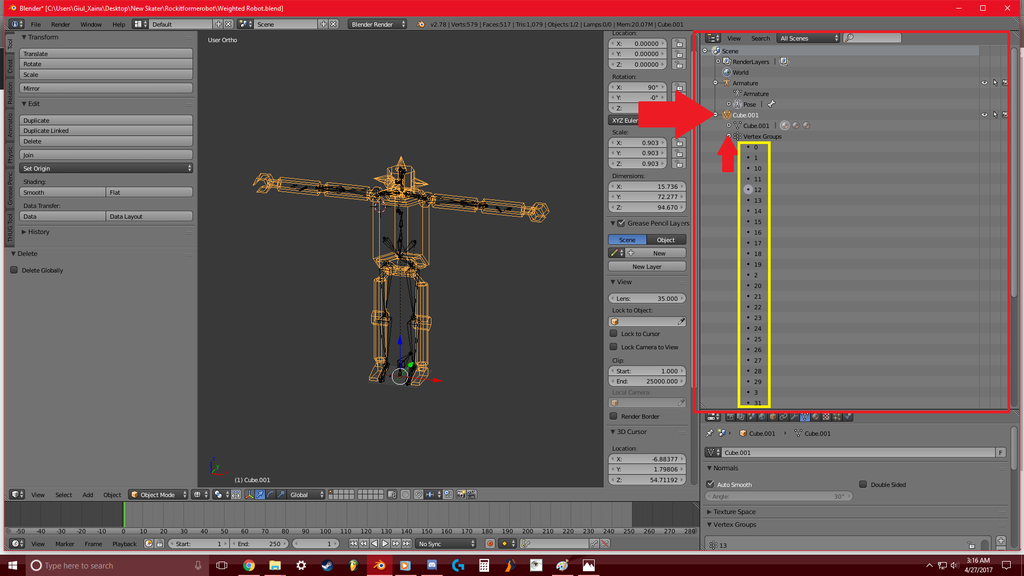


This shows you if your model now has the vertex groups. if they don't have numbers 1 through 50.... or is it 49? I don't know. but make sure in the vertex groups it has most, if not all of the vertex groups from 1 to 50.... I am not sure if it is 50 total. And there might be a few vertex groups MISSING. but that is NORMAL. For my raptor skater; I don't think I ever used group 3... or 13... or one of those numbers. Just make sure they have the vertex groups!

Quote
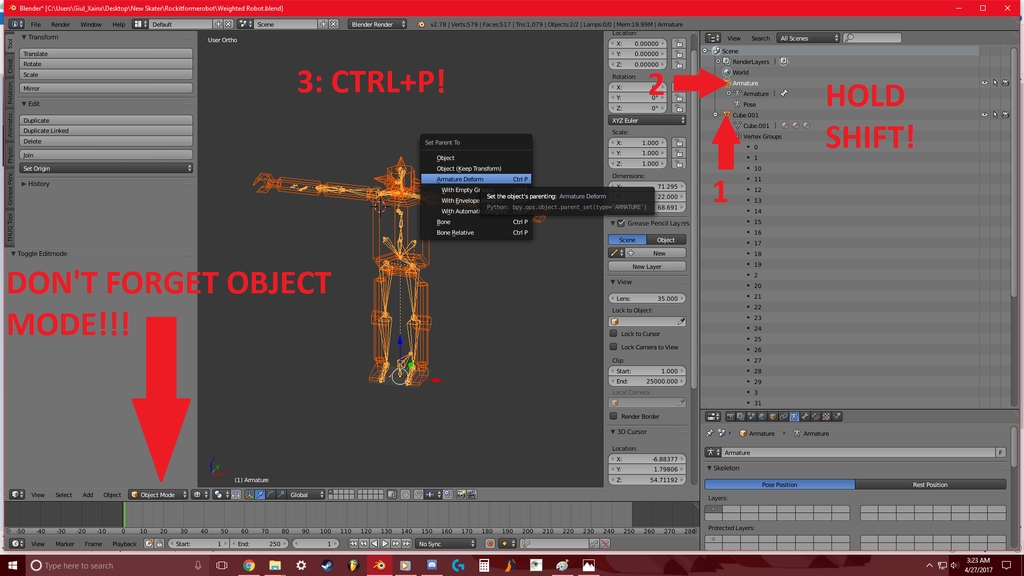
6. in object mode, select your model, then the armature. press ctrl-p and select armature deform.

So staying in the wire frame mode.... you need to select your bad ass skater model FIRST. And THEN THE ARMATURE. Which to make it VERY EASY for you... just click these in the menu on the right hand side in this order, and then hit CTRL+P.

MAKE SURE IT LOOKS LIKE THIS BEFORE HITTING CTRL+P! If you don't see the armature as full yellow... you need to do it over again. So CTRL+Z if you did not do it correctly and try it again.


Quote
7. if you set the armature to pose mode, then switch your model to weight paint mode, you should see the weights for each the selected bone. the polys around the bone should be red.
8. you can paint over the weights if any look incorrect.
9. while in weight paint mode on your model switch to tools tab on the left (if you can't see the tools panel it can be toggled with T). in the weight tools tab press limit total, and set the limit to 3 for all groups. then press normalize all, again for all groups. uncheck lock active.

Now I have a problem with this.... Only because all of my models have parts that extend WAY BEYOND those vertex groups and bones (Those arrow like ball things you see.) So I edit them MANUALLY.

So I am going to cut it here before we hit the lovely export button.

*! BUT CON-SEPT! JUST HIT EXPORT BRUH! YOU DONE NIGGA!*

NO I AM NOT! And just to show you what happens when you export it how it is right now.... Here it is in THUG pro if you just hit export now and don't manually edit the vertex groups:
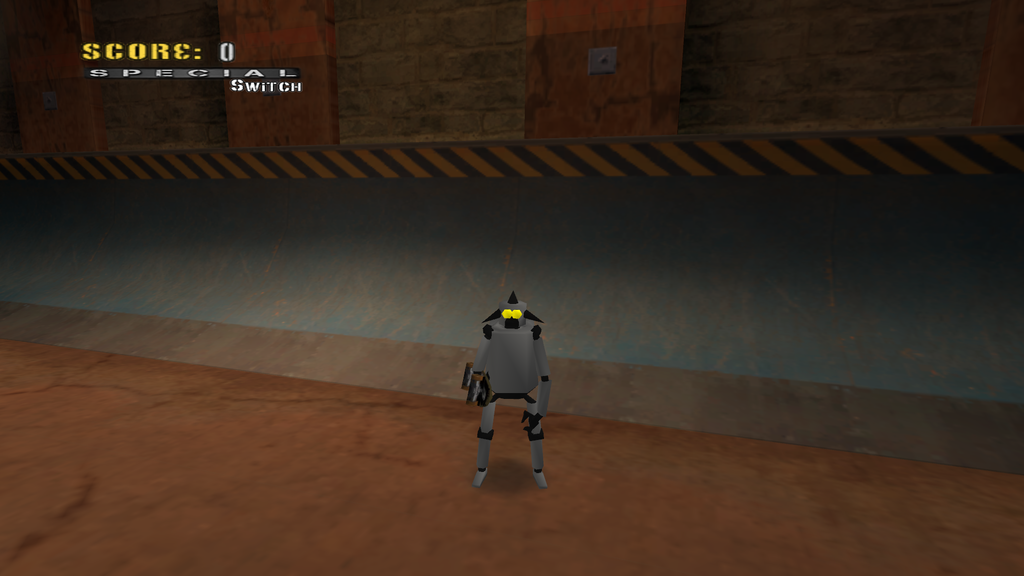


notice how he looks SAD? Probably because his ears.... or cones... are malformed...

And when the skater runs... he has all sorts of malfunctions in the vertices....

SO we need to edit the vertex groups MANUALLY!

SO! back to blender!

What you need to do, to make sure your custom skater looks AWESOME no matter what he does... you need to make sure each vertex group is assigned properly.


SO. Open up a new blender window, and put it side by side with your weighted skater file opened in blender.

you need to check every single vertex group and align it with the vertex groups found on the source model.

it is a bit of a PAIN IN THE ASS! but it needs to be done!

Here is a photo to show you how to do it. And make sure you do it like this for every vertex group. Mimick them!

In your skater file you need to go to this area first! It is the box below the other box on the right hand side. Click in the areas, after selecting your model in edit mode, to quickly select and deselect certain vertex groups.
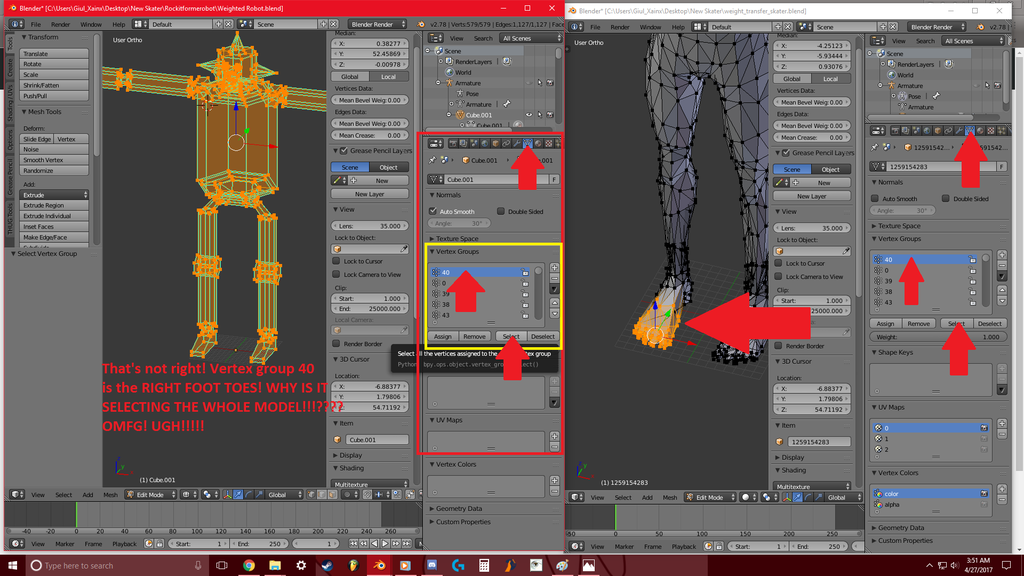


using both blender windows, you can quickly SELECT certain vertices and set them manually like so:
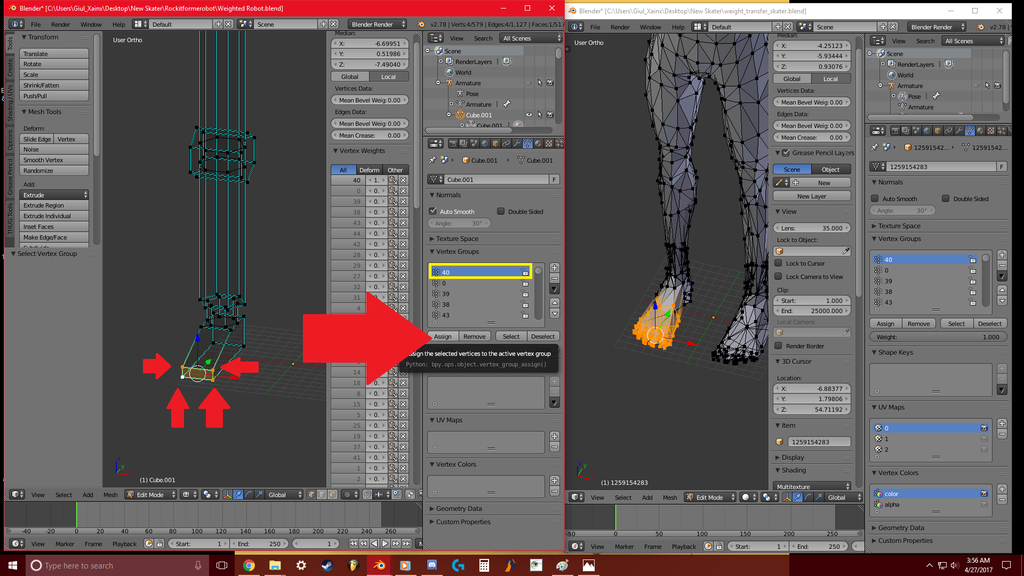


Then make sure to remove the other vertices from the group by hitting CTRL+I to invert your selection. Then hit Remove from active vertex group.
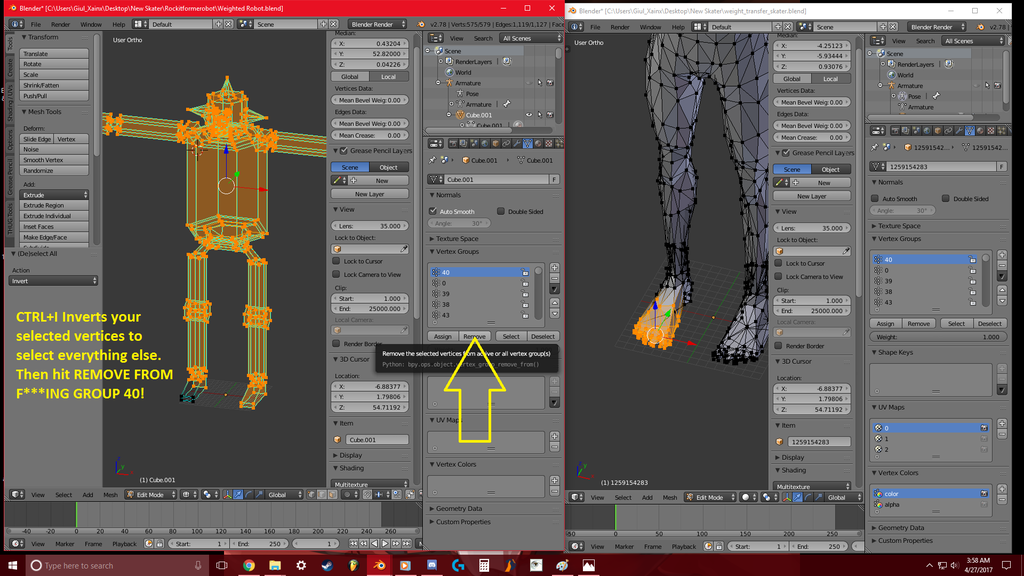


Then you need to re-select vertex group 40, and remove these vertices from every other group. There is a very fast way to do this as shown in the next picture.
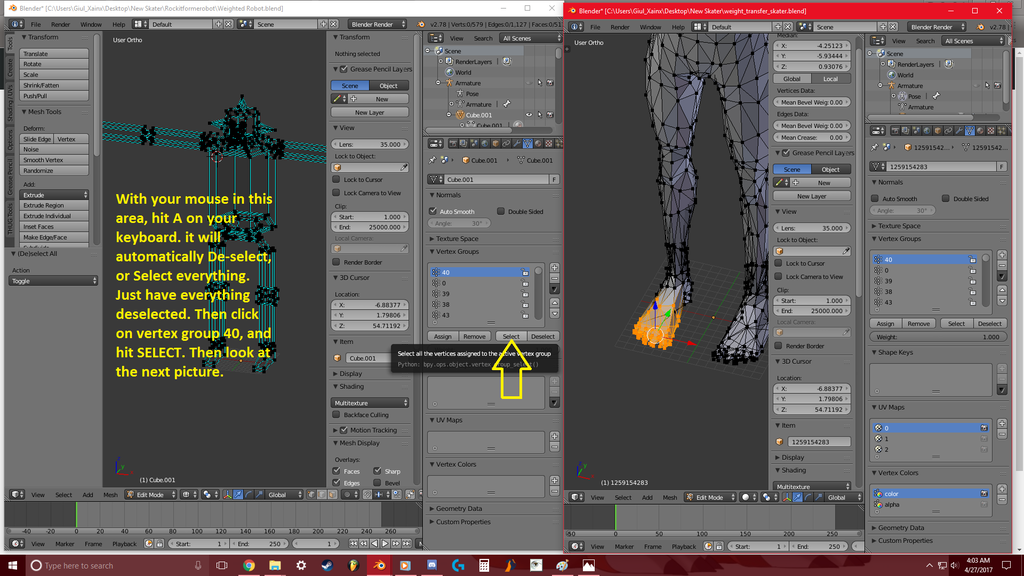
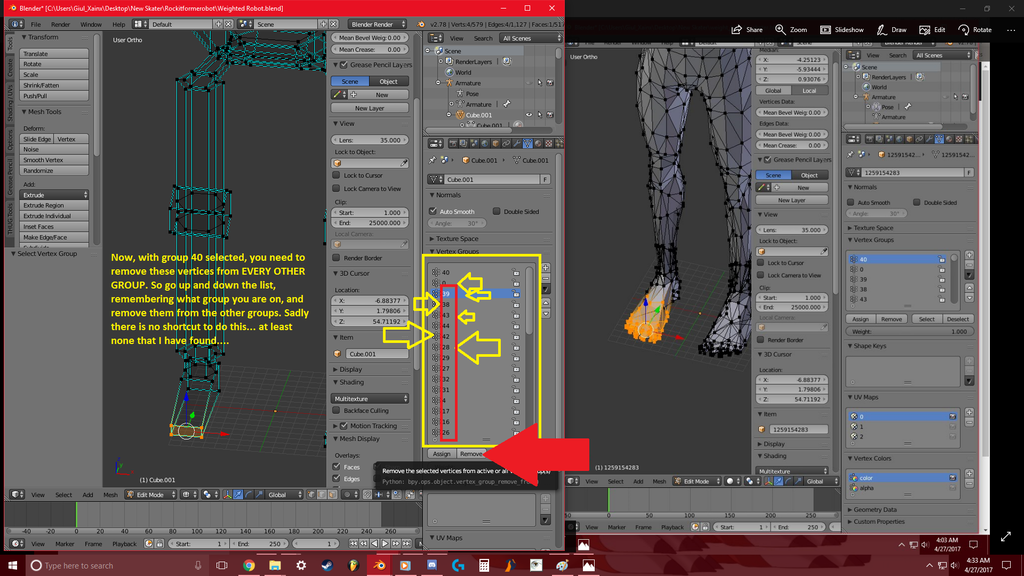


Repeat this process until all of the vertex groups are properly assigned. otherwise your skater is going to be another monster from the glob lagoon. or the spiked lagoon....

Also... some vertex groups overlap other vertex groups. I forgot to do this on this model, but it turned out fine. Just remember which vertex group overlaps which.

If done correctly, click on a vertex and in the yellow box... you should see a list of weights that are applied to certain vertex groups.... If there is only 1 in that yellow box it was done correctly. If you see a list of all 40.... you missed a vertex.

Honestly I remove each group from all of the other groups to MAKE SURE it isn't assigned to anything else. vertex group 0 isn't even needed. but for what ever reason it selects a bunch of vertices on the model in the skater file.... when my raptor skater doesn't have anything set to vertex group 0.
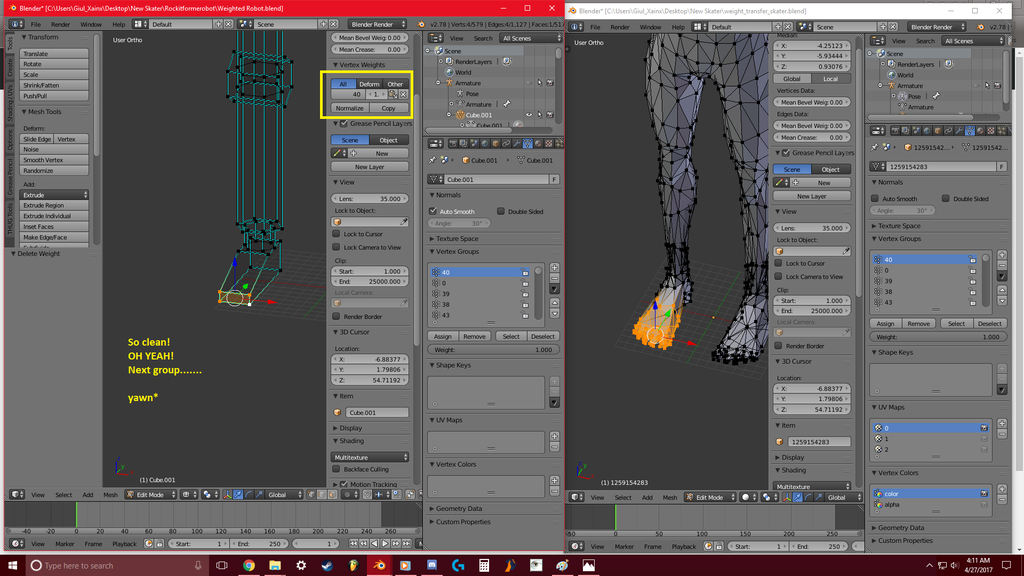


NOW after all of the vertex groups have been PROPERLY assigned....

Quote
10. if you have done the above correctly the model should be good to export. export the model as thug 2 level files. uncheck everything except for the generate .tex and .scn file options. the produced .scn is the .skin file.
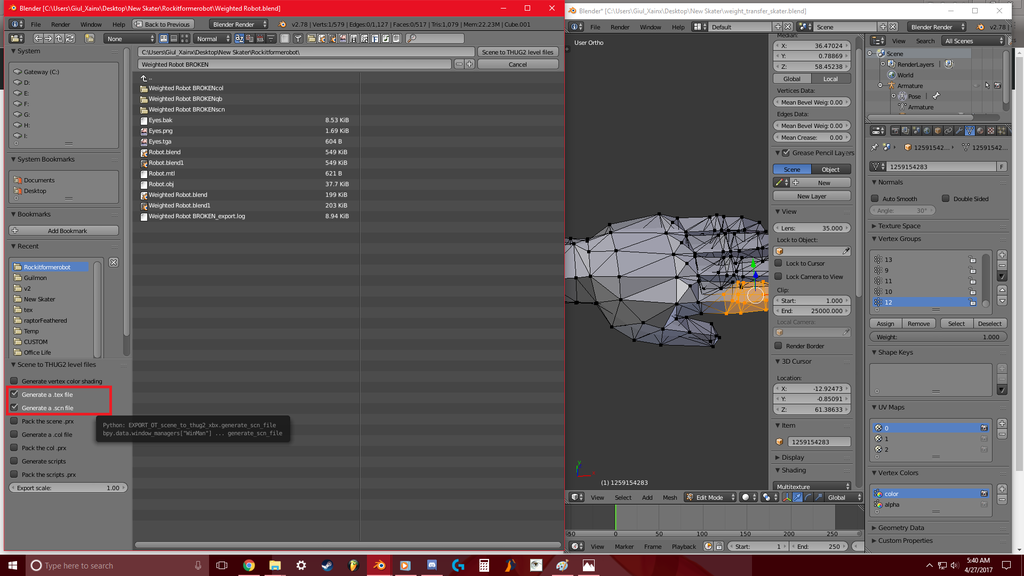


OMFG... a small project to help others turned into my whole night being given away...


OK now the FINAL PART! Which.... is in the read me part for you to understand how to get a skater imported. F*** it. just copy pasta.....


This Read me file is for people who have multiple custom skaters. As well as first timers.

To install RockitformeROBOT skater you must backup \Activision\Tony Hawk's Underground 2\Game\Data\Pre\skaterparts_temp.prx <<<< first.

(save it in a folder on your desktop marked THUG2 original files)

THEN DELETE that file from the folder. (it is the only way it will work.)
Copy and paste the file with the same name located in this folder into the game folder.
(This allows reading the file in the folder versus the encoded ultra hidden files.)

Next, go to \Activision\Tony Hawk's Underground 2\Game\Data\models\Skater_Secret

Pick a skater to replace and do the following:

Make a backup of the secret skater's SKIN and TEX files

For example:
Skater_COD.skin.xbx <
Skater_COD.tex.xbx <

Save them in your THUG 2 original files folder. (JUST DO IT! you'll regret it later if it kills your game!)

DO NOT DELETE THEM YET!

Copy both of the "Weighted Robot" files into this directory first!

Right click on a secret skater's "SKIN" file and hit rename, Then copy all of the text before the .xbx

Now delete the ".skin" file. (Do not delete the .tex file yet.)

Now right click on the "Weighted Robot.blend.scn.xbx" file, hit rename, and paste the text copied from the skin file into the name of this file. Hit enter.

Now do the same with the secret skaters .tex file. Copy the text, then delete the secret skater .tex file, then paste the name of that file into Weighted Robot.blend.tex.xbx

If you do this while in game, you have to quit to the main menu, or if in the main menu, go into a level, then quit back out to the main menu to see changes take effect.

Enjoy this flat colored robot skater!

YAAAAY. Now that you understand what it takes to import a skater... you can spend the next 8 hours doing this!

Remember.... you could be lazy... and end up with another creature from the black lagoon. if you really want those awesome looking custom characters... YOU GOTTA PUT FORTH THE EFFORT TO MAKE SURE IT IS AWESOME!

The raptor skater took me two days to complete because I was trying to be lazy about it. Then I figured it out... and the rest was C A K E baby.

13
Questions & Tutorials / Custom Skaters: From blender to THUG 2
« on: April 27, 2017, 08:05:48 am »
So you have a custom skater, but you don't know how to port it over to THUG 1 or 2 right?

We would love to see more custom skaters in the game, but not a whole lot of people know how to do so. And this is something anyone can learn in a matter of days. Sometimes hours if you are a fast learner and can remember shortcuts.

Let us start with the basics. And please read this all the way through!

===============================
CREATING YOUR SKATER!

Step 1. Download and install blender. (Current version I am using is V 2.78c) https://www.blender.org/
Step 1.a: if you have never used 3D plane editing software before I strongly advise you to look up some introduction tutorials on youtube:
https://www.youtube.com/results?search_query=Blender+introduction+tutorial

Once you are able to figure out how to use the software move onto the next step.

Step 2. Before we begin you need the thug tools plugin for blender.

In Sk8ace's post here: http://thpsx.com/forums/index.php?topic=461.0 you should find a python script add on for thug pro.

it should be the latest updated file. At least Sk8ace tries to keep it updated with the correct tools.
So download these three files one at a time and export them to your dektop:
Quote
Sk8ace:
...

Blender Thug1/2/Pro Plugin by asdf
https://mega.nz/#!hc5iUIZS!0B5zsHHZEU2dRfa5iiGsmZ1UhXfJKv_OHNH9eFZmJBE

Updated Blender Python Script by asdf
https://mega.nz/#!VNJikB6Z!FE4mbytJGXrSGIAYG3jNwNJ3qoO-Pauv2Yoqg14lGHA

...


Step 2.a

Open up blender, DO NOT DELETE ANYTHING YET, and do the following:

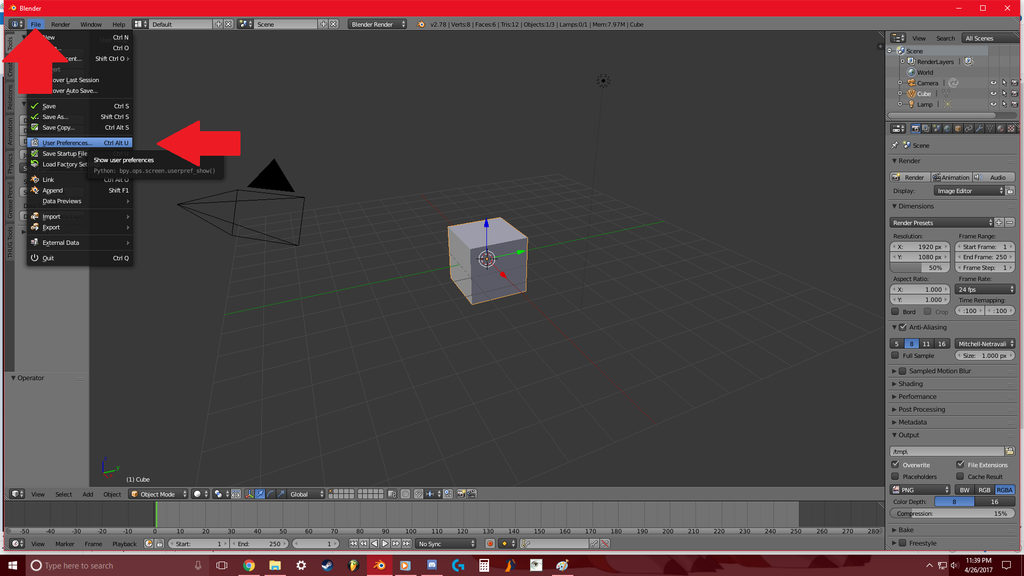
Got to File and select "User preferences"


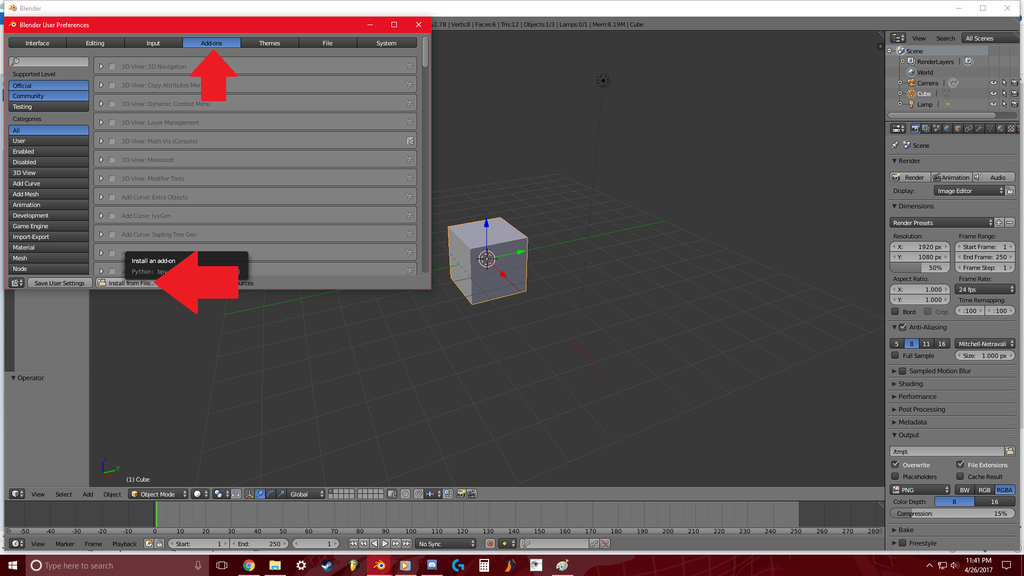
Then go to "Add-ons" and towards the bottom of that window it should say "Install from file"


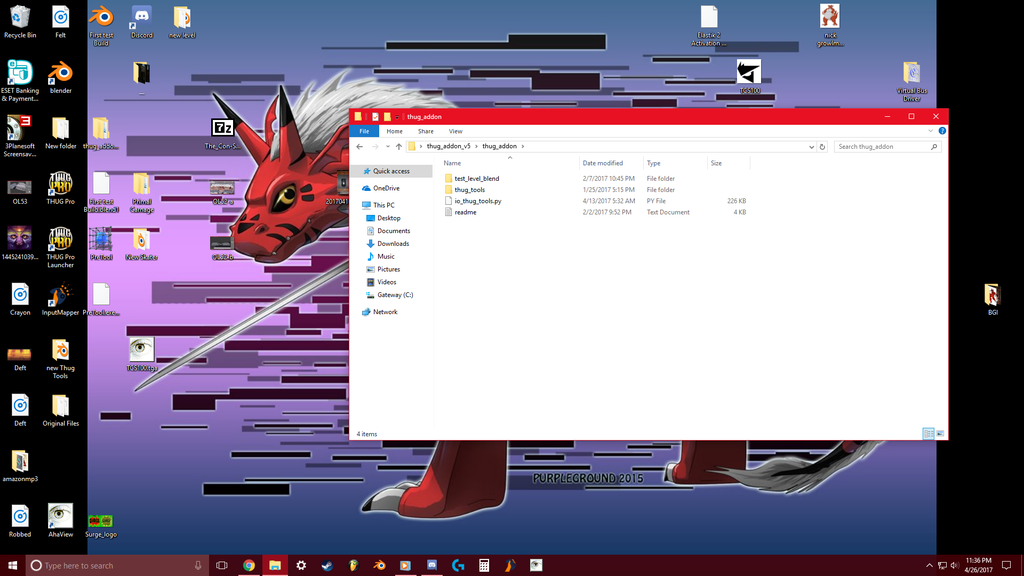
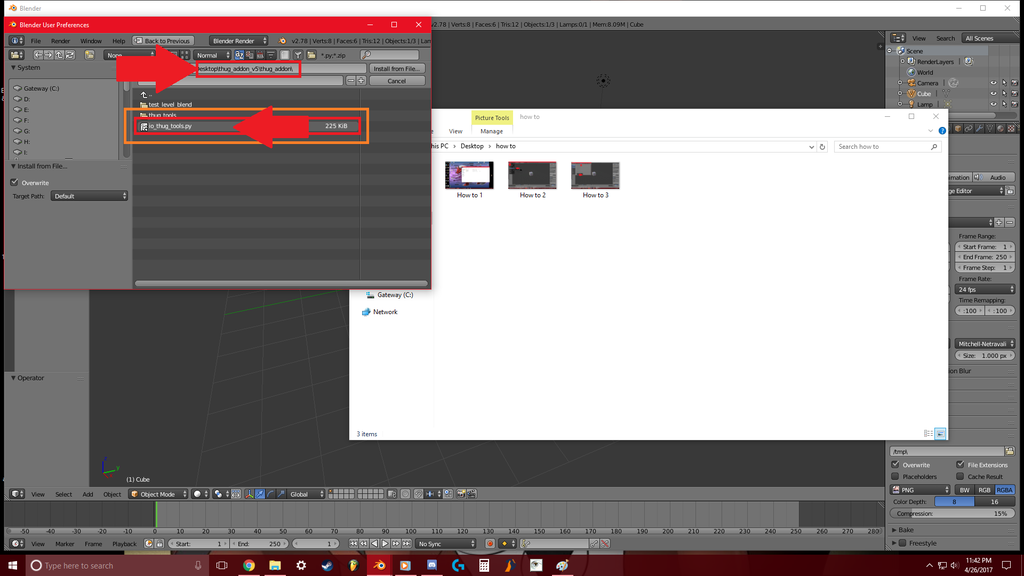
Then navigate to where the thug tools are and select the "io_thug_tools.py" file.


And I know I did not have a red arrow of what you are supposed to hit next, but in this same window there is a button that says "Install from file." hit that button on this screen. It is on the right hand side of the small window pop up after you hit the file location.

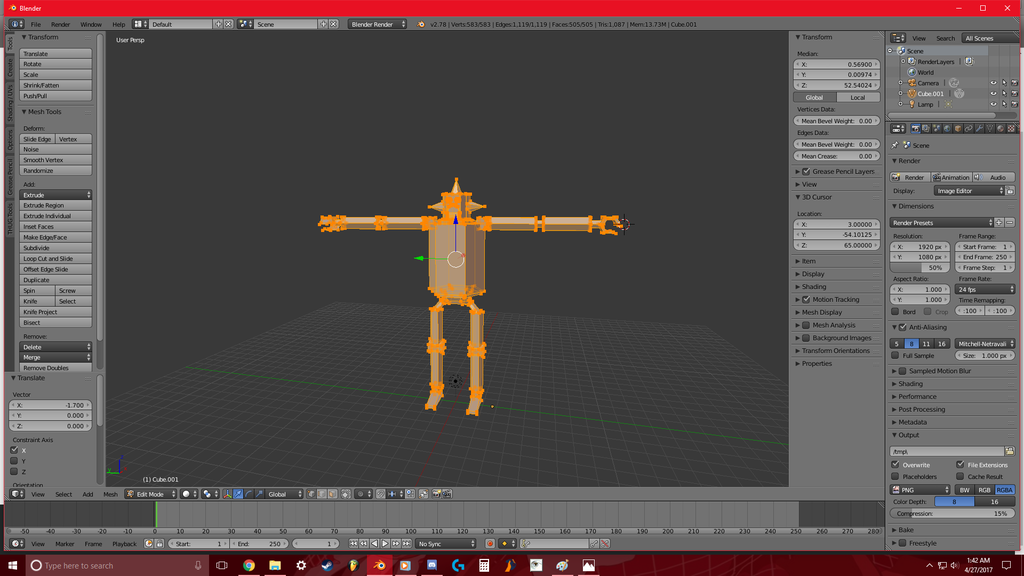
If done correctly what you should see in blender now is a new tab in the tool selection bay that says "Thug tools."

Now real quick select the cube in the 3d plane space and click on thug tools. (if you didn't watch any youtube blender tutorial videos... you will be lost at this point!)

Just as practice you need to remember to split your faces automatically upon export. Doing this now will save you from crashing your computer. never have any number of faces, PER OBJECT, above 300 faces. If you watched enough tutorial videos on how to split objects from one to create a new object, it will be a snap to figure out what this means. And yes you can have more than one object as a complete skater in THUG. My raptor character had its wings and mohawk are separated from the character's vertices as a new object.


Just remember that each and every object you create will have "split faces upon export" automatically UNCHECKED. So please make it a habbit of making sure, before you export anything, that each object has that checked just as security. unless you know your objects have less than 300 faces.

Get ready for the hardest thing to do. (Hey now doing things the hard way at first is a great learning experience! But it can be one hell of a process to create a model for use in THUG pro. but if you learn how to do this now, you will be one step closer to becoming a real video game designer!)

XXX
If you already have a custom skater model ready to go, then skip the creation of your new skater and go into the next phase <<<<<<<<<<<<<<<<<<<
XXX

Step 3. GO WILD!

Create something crazy! here is something that I created: Took me about 2 hours to do so.


(Make sure your created model is in a T-POSE!)

Now at this point with your created model you are really only half way finished. next up is DRAWING!!!!!

I can hear it now: OMG Con-Sept! This is totally taking for ever already! You mean I have to actually DRAW!!!???

Well if you want your model to look ultra realistic yeah... go ahead and OPEN UP MS PAINT and start drawing!

hahahahaha! evil laughter over... if you are trying to import a famous figure, chances are they already have a model available online. Like if you want harrison ford: http://steamcommunity.com/sharedfiles/filedetails/comments/156923584

Someone has probably already created a full 3d model of that actor. So all you need to do is find its .DAE or .OBJ file online somewhere. There are a few places for you to go online and find literally MILLIONS of models!

use this site: https://www.models-resource.com/

Chances are you will find everything from famous actors, to video game models ripped straight from their video games. If they don't have the model you are looking for... well then.... MAKE ONE!


or... if you are making a model of yourself.... then all you need to do is import your face.... onto a face model.... And then... you know what? just import your face onto the skater reference file, and then edit the vertices on that reference model, and then you have yourself in the video game. only when you edit the vertices on the skater in the reference file... you can make yourself look ULTRA REALISTIC IN ULTRA HIGH RESOLUTION BY ADDING MORE FACES TO THE MODEL! (This will happen at a later time.... I just want to show people how to do stuff with a full created 3d model, or with an imported model from a huge resource site.)

So for my model... I am just going to do a flat color. And I am going to do something extra special with this model in terms of its looks mainly with the eyes since someone keeps saying "SOMEONE MAKE ME A MODEL OF THE ROBOT FROM ROCK IT FOR ME BY CARAVAN PALACE!!!!!!!!#%&*(*^%$"

(I am looking at you dude.....)

So now I am going to color it. And I am doing a flat color. Since this is a robot... I am making him simple. SO. if you want to learn how to add textures and such in blender... then search for UV mapping in Blender on youtube. and from there you should be able to quickly understand how UV maps work with image files.

BEFORE YOU USE THOSE ULTRA HIGH RESOLUTION PICTURES! YOU CAN NOT HAVE THEM AT A PICTURE SIZE HIGHER THAN:

512 Pixels by 512 pixels.

SUPER IMPORTANT TO KNOW! So please. keep the texture files SMALL! Go any higher than 512 pixels by 512 pixels will cause major lag issues in the thug pro engine and CAN KILL YOUR PC! (So please heed these words NOW! The THUG pro engine can't handle TGA files larger than these pixel specifications!)


So now after coloring the faces... and setting everything up we can move to the next PHASE....


We need to export this model, FIRST, into an object file.

(Remember to save your model before doing this! if blender fails.... there goes your model. You can try "recover last session" to see if you can retrieve your model if you forget. but chances are... you will LOSE EVERYTHING. Just accept it and try, try again.)


if everything went well... NOW IT IS TIME TO WEIGHT TRANSFER YOUR MODEL! (yay!)

==========================================

14
Questions & Tutorials / Re: Where do you put CAS files?
« on: April 27, 2017, 01:11:33 am »
did you dummy the skaterparts.prx files


^^^

There should have been a read me file with your CAS... or maybe you downloaded the wrong version of a CAS? There are thug 1 models and thug 2 models... Most of the new models are for THUG 2. not THUG 1. It makes a huge difference.

15
Create-A- / Re: Raptor Skater
« on: April 26, 2017, 01:30:14 am »
Well I could always go back in an just.... enlarge the tail. But I want to do a whole cast of creatures that are hard to port into thug. At least interesting ones. If you can pull up a model, I can port it to thug pro.

Pages: 1 2 ... 5 Next