Category: Tutorial
(Outdated) THUGPro Mac Install Tutorial
(This only works for older versions of Mac OS) THUG Pro Mac install tutorial created by TylerLasagna! Full video is contained on our YouTube channel: https://youtu.be/vi6PBHwvAFU Two things you’ll need: THUGPro Setup, and a copy of THUG2. Having issues with your set-up? Please post in our forums.
THUGPro 0.6.0.6 Custom Level Support
Let’s talk about the new feature added to the THUGPro 0.6.0 update: Custom Level support!
Yup, Custom Levels have been a thing since back when I put together that other Custom Level video…but this recent update to THUGPro just makes it an absolute SNAP!
No more having to replace files from other levels and constantly having to swap those out and then just have it all be erased the next time you play with the auto-updater. When you add a Custom Level now it’s there for good! It gets added to the menu and you load it and forget having to mess with it again.
OK then, let’s get cooking on how we actually DO this…
Step One:
First navigate to and check out the Online Vault under Community Creations here on our site. Look through the Custom Levels and be sure to find one that has the blue check box in the upper right-hand corner of the thumbnail. That check means the level will work with the Custom Level support in THUGPro 0.6.0 If a Custom Level doesn’t have that check mark then you will have to play it using the old process found in the video I talked about before.
Once you’ve found a level or six that you’d like to check out click the download button and save it to your local computer.
Step Two:
Next navigate to the folder where you saved the archive and go ahead an extract it. Remember where this extracted folder is and be ready to access it.
Step Three:
Open this directory within the THUGPro folder structure: C:\Users\[username]\AppData\Local\THUG Pro
Once in there go back to the archive you extracted and copy those files into the THUG Pro folder.
Step Four:
You’re done! Go play! What?! That’s it?!?! Yup, it so easy anyone can do it. Open up THUGPro and go play!
Some caveats:
- If you are already running THUGPro you’ll need to restart it to have the level show up
- Some Custom Levels are not playable online. Most creators have noted this in the description or ‘Read Me’ file within their archive.
- As has always been the case: if you do want to play the Custom Level online with friends, everyone who wants to play will have to add the level to THBUGPro via the steps I just outlined. There is currently no way around this- but with the process being so easy now it’s really easy for anyone to do!
- Sometimes the archives will have a bit different format and not include a ‘User’ folder or will look a bit different than what was described above, if you find one of those just copy the files in the archive to the same path listed above and then go into the ‘User’ folder and copy in there. Most of this is outlined in the ‘Read Me’ file in the archive, but if it doesn’t seem straight-forward hit us up on Discord or post a question on our forums.
- Any questions? Please post on our forums.
I have to say that these Custom Levels are getting better and better, multiple creators are putting out exceptional quality levels that easily rival the “real” levels. Seriously! They are that good. Why more people aren’t playing these online and just in general is unbelievable to me. This is a great way to extend the life of this series and I would encourage everyone to check it out!!
Thanks to everyone for reading, all comments are appreciated and welcome- hope to see you online enjoying some quality Custom Levels!
THUGPro: Adding Custom Soundtracks
So by now everyone knows the latest version of THUGPro has been released and one of the cool new features of it is that you can now add your own Custom Soundtracks!
Want to listen to Beethoven’s 5th while grinding away in Marseilles? Now you can! A little MxPx while doing airs in Santa Monica? It’s now possible!
This has been a highly requested feature since forever and the devs have made it easier than ever to achieve in THUGPro. So how do you do it? Let’s get started on finding out how…
Step One: Prep Your Music Files
The first thing you need to do is get your music files prepared. Figure out what songs you want to include in your soundtrack, be sure you own them, and then get them downloaded to your computer. People have reported issues with using .mp3 files. If you have issues, convert the .mp3 to .wav first, then convert to .bik.
 From there you need to covert your music files from whatever format they are currently saved on your computer as to the .bik format. What the heck is .bik format?! It’s better known as: Bink Video and it is a proprietary video file format developed by RAD Game Tools, and is primarily used for full-motion video sequences in video games.
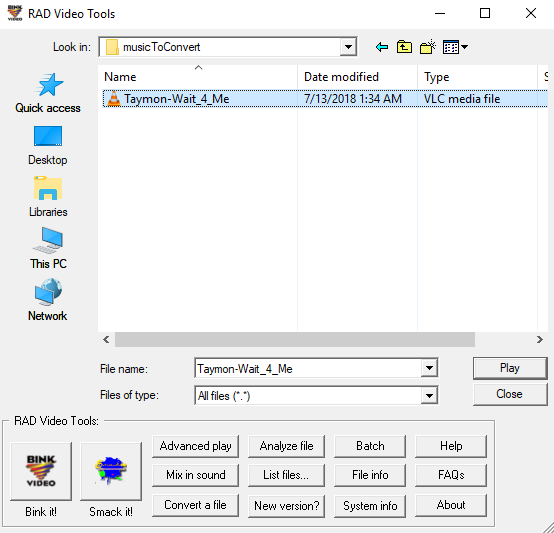
To covert your song files to the .bik format you’ll need a conversion tool. Rad Game Tools has a free open source conversion tool available from their website: http://www.radgametools.com/bnkdown.htm. Download the ‘RAD Video Tools’ program and install it on your computer.
Once you open the RAD Video Tools program navigate to the folder where you saved your song files for your soundtrack. Select the file you want to convert to the .bik format and click the ‘Bink it!’ button. Yes, you do have to convert each file one at a time. The RAD Video Tool does allow you to create a list (basically a playlist) however it won’t work properly in THUGPro. (Yes, I tested it.)
After clicking ‘Bink It!’ the Bink compressor window will open. You’ll want to tweak a few settings in here 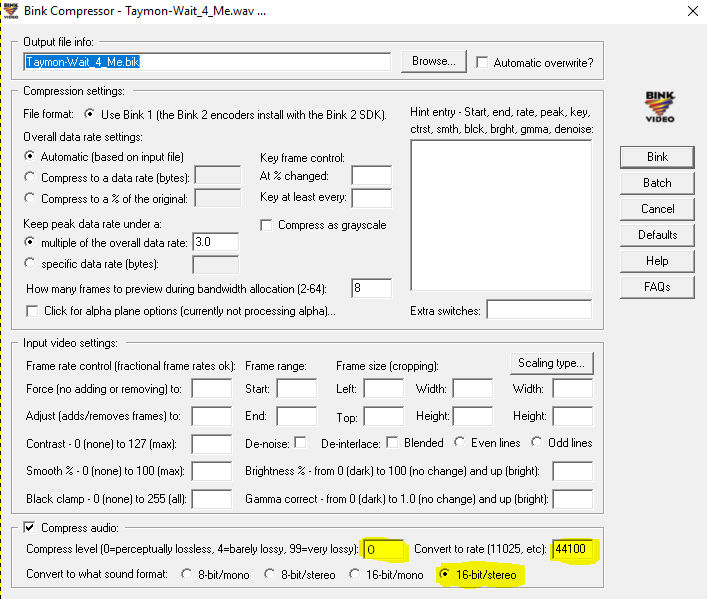 to get the best possible quality. After some playing around we found the only thing you need to change from the defaults in the last section, ‘Convert audio’. Change the default “4” in Compress Level to 0, Add ‘44100’ to the Convert rate box and set the ‘Sound Format’ to 16bit/stereo.. that’s it. The rest of the default settings should stay the same.
 From there click the ‘Bink’ button and the conversion will begin automatically. Once the conversion finishes click the ‘Done’ button and you’ll be back to the main Bink Video window. Rinse and repeat this process for all of the songs you would like to add to your soundtrack.
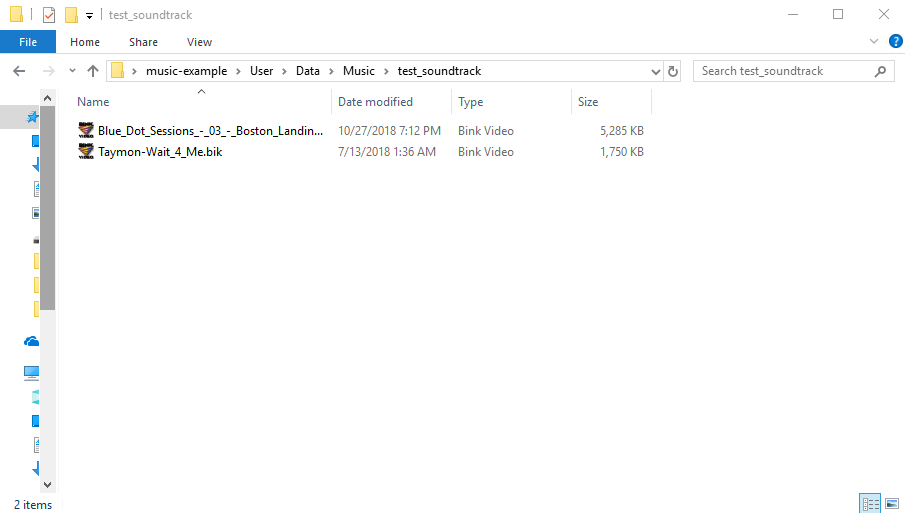
The final part of step one is to create a folder for your soundtrack files. To do this open the folder where you saved your original soundtrack files. Add a new folder and make sure it is named appropriately for your soundtrack. Now add all of the freshly converted .bik files to this folder and don’t forget where you saved this folder – you’ll need it later.
Step Two: Create Your .sound.json File
THUGPro requires a .sound.json file in order to properly load your Soundtrack into the mod. No reason to start from scratch on this, here is an example .sound.json file for everyone to use and model your soundtrack from. You can use this file as a template for all of your soundtracks. The archive for the example can be found here: http://thpsx.com/thugpro/music-example.zip
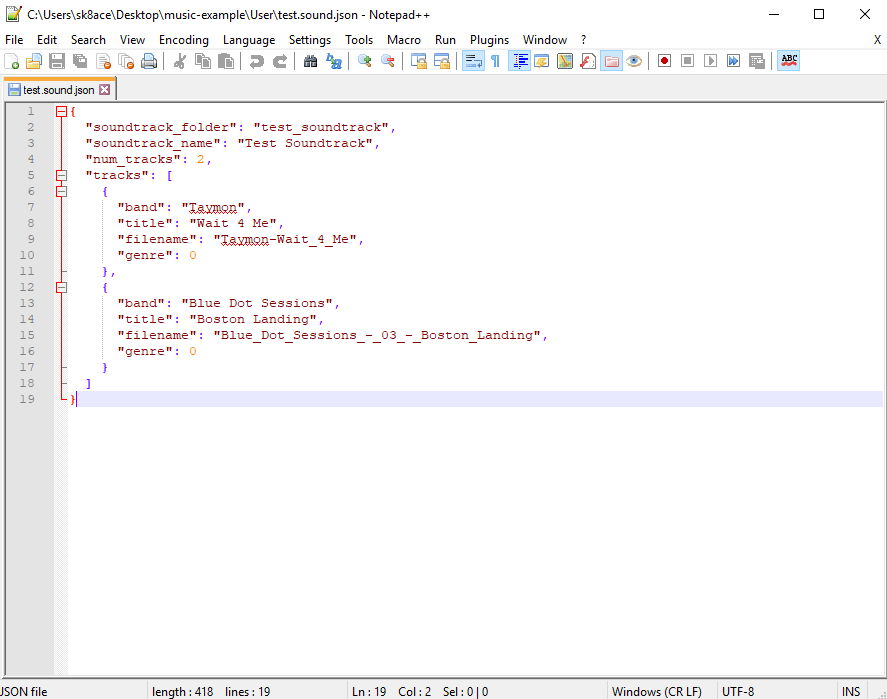 Download the archive and extract it on your PC. Once you have extracted it you will find a file called ‘test.sound.json’ – open that file with the text editor of your choice. You can use Notepad even if you don’t have a favorite text editor.
Ohh scary…code! Don’t be intimated by it, the work you’ll need to do in here is very minimal and quite easy to complete. The first line references the Soundtrack folder. Change the text in the quotes to match the text of what you named your soundtrack folder EXACTLY. If you have any typos this will not work. Don’t delete or remove the quotes!
Next change the text in the ‘soundtrack_name’ quotes to be whatever you want the name of your soundtrack to be. This will be displayed within THUGPro. Please don’t delete those quotes!!
Change the number ‘2’ in the ‘num_tracks’ line to be whatever number of songs you are including in your soundtrack. Various people in the community have tested the maximum number of songs that can be included and it is being reported the max is 80! We have not tested or verified this but have at it!
Now comes the more tedious part: editing each section of code for the songs. For each song edit the band, and title to match the respective band and title for your soundtrack. Duh? Seems obvious but is an important step.
Next is the most important part: the filename. This must match EXACTLY the file name you saved your .bik file as. Uppercase, lowercase, spaces, numbers, etc all must match precisely, or it will not work properly. You do not need to add .bik to the end of the name as the mod will recognize it as such without adding this.
The final line in the song section is ‘genre’ and this does not need to be changed from the value zero as THUGPro doesn’t show genre within its display.
From here continue to edit each song section to match that of your soundtrack. If you need to add or remove song sections from the .sound.json file it is VERY important to copy ALL of the code or remove all of it. Including any curly brackets ‘{‘ and commas ‘,’. If those are not in place properly the soundtrack WILL NOT WORK PERIOD. Also, please remember that all quotes around every line where you edit are important. Do not delete or remove these or this WILL NOT work.
You can use a JSON validator like this one to make sure your .sounds.json file is correct: https://jsonformatter.curiousconcept.com/
Just paste in your json code and hit “Process”. It will either verify that your code is correct or if it’s not, it will correct it for you. Take the corrected code and paste it back into your .sounds.json file.
Once you have made all of your edits save your file using ‘Save As…’ in your text editor. Be sure to remember where you save your file as it will be needed in the next step.
Step Three: Add Your Files to the Proper THUGPro Directory
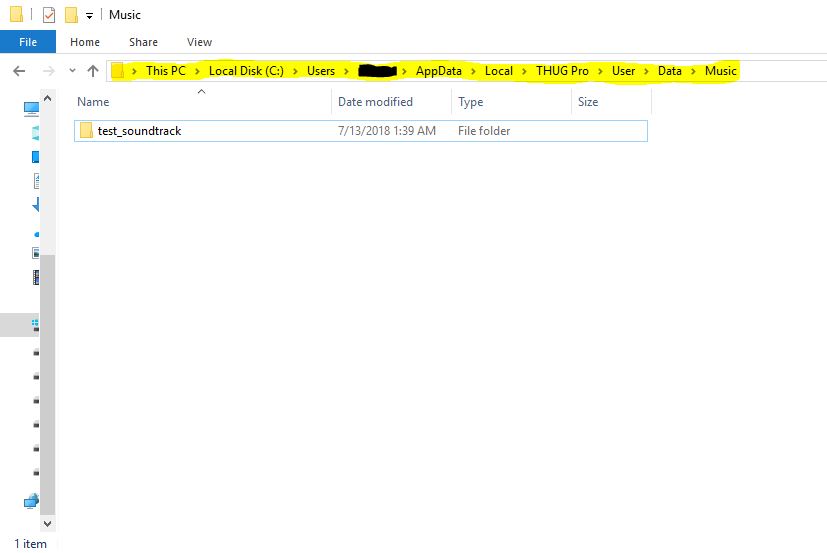
 OK – now it’s time to get to the good stuff! Ready for that oh so sweet sound of Marvin Gaye as you cruise through the streets on Minneapolis? Remember that folder you saved for the Soundtrack? Good, find it and be ready to move it. Navigate on your PC to: C:/Users/[Your username]/AppData/Local/THUG Pro/User/Data/Music. Drop your Soundtrack folder into that directory. It’s important to follow that path exactly or this won’t work.
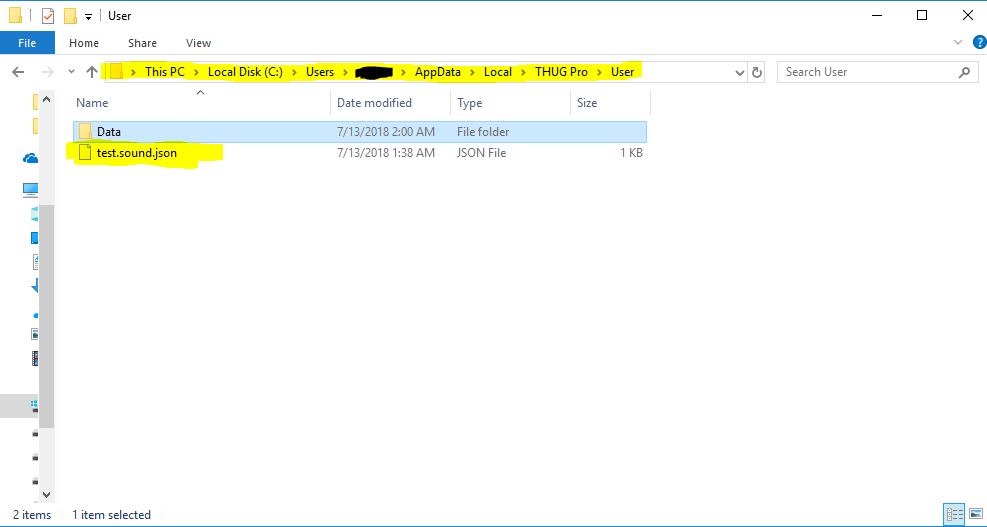
Now, remember that .sound.json file you spent so much time editing? Locate it. Now navigate to: C:/Users/[Your username]/AppData/Local/THUG Pro/User and place the .sound.json file in there. The .sound.json file MUST be in that directory or this won’t work.
Oh man, that’s right, it’s finally time to hear that sweet goodness of Sinatra’s ‘New York, New York’ while grinding those power lines in Manhattan!
Step Four: Access the Soundtrack in THUGPro
 If you had THUGPro open while you did the first three steps, go ahead and close it and re-open it. Your new soundtrack will not be available until you close and reopen the mod.
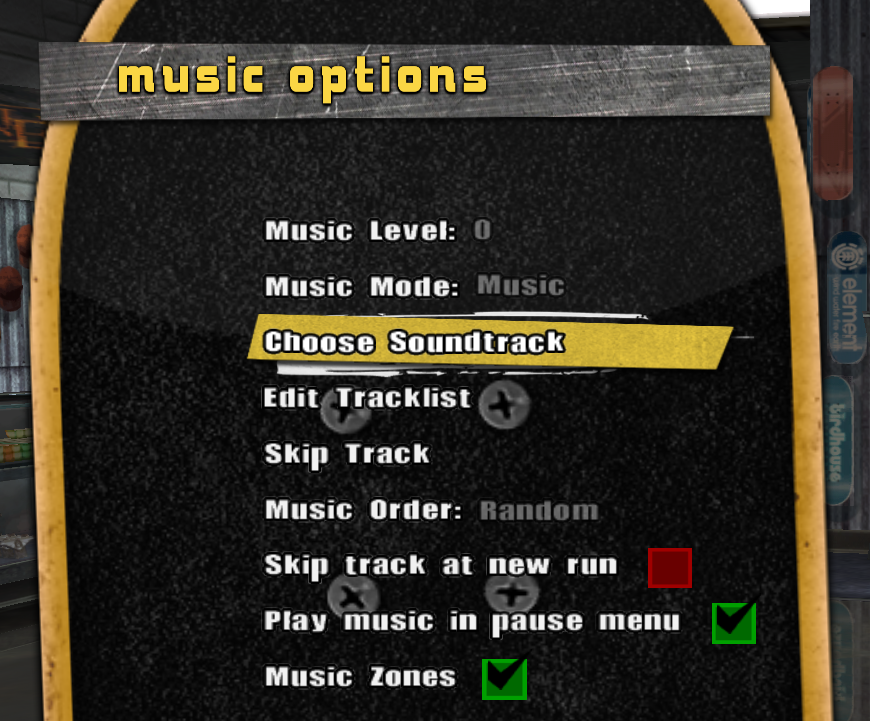
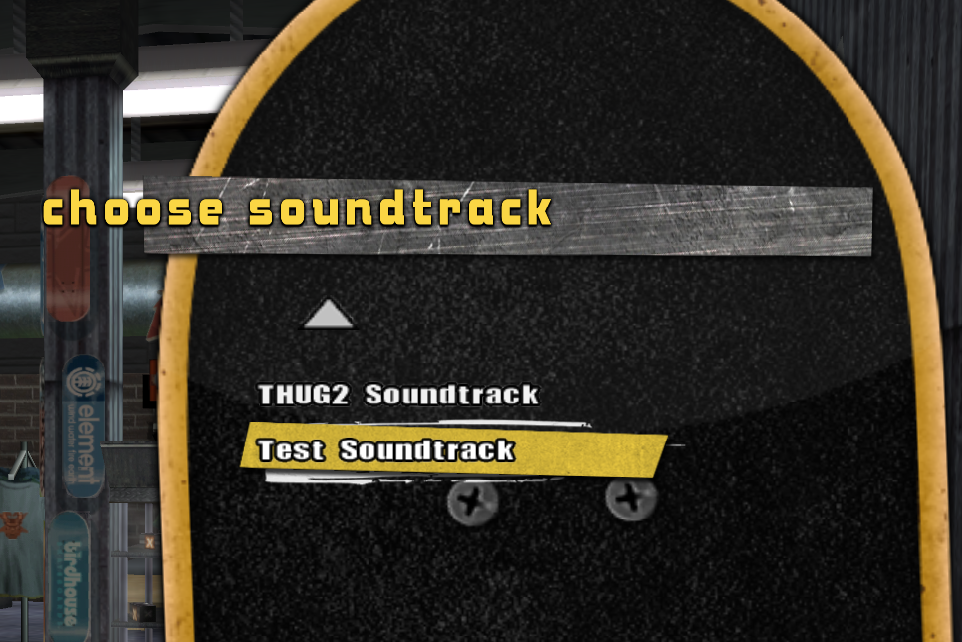
Once you have opened THUGPro on that swanky main screen navigate to ‘Options’, then ‘Music’. Go down to ‘Choose Soundtrack’, and if all is good your soundtrack name should appear in the list. Highlight your soundtrack and then hit accept. Finally go back to the previous screen and if you have your music options turned up your first song from your soundtrack should start playing! Congratulations you’ve successfully created your first Soundtrack into THUGPro. Go ahead and buy yourself a cookie, or give yourself a pat on the back, or something…
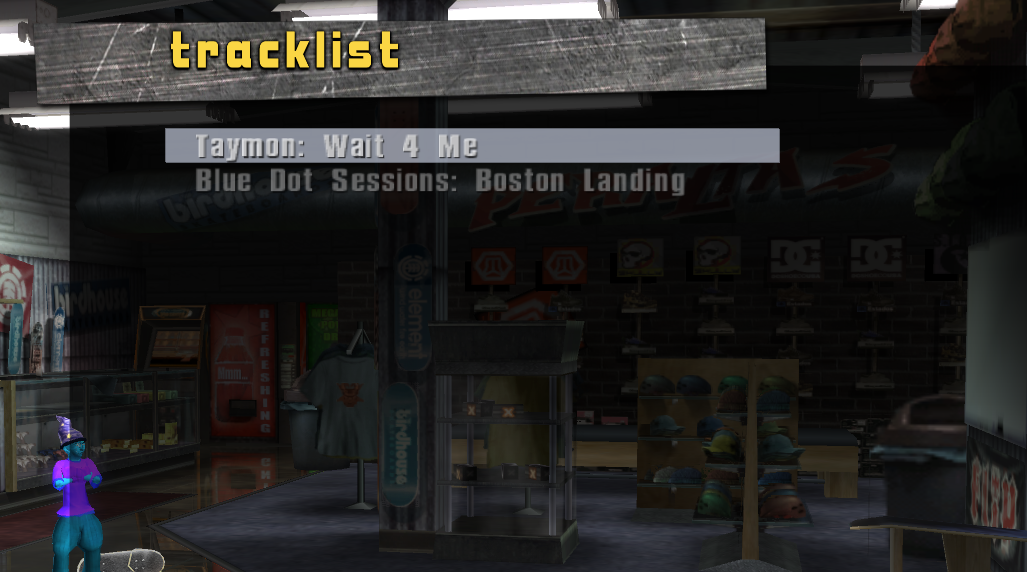
To confirm your entire soundtrack is imported correctly: on the ‘Music Options’ screen select ‘Tracklist’ and if all is good you’ll see your entire list of songs on that screen.
 The BEST thing about this new option in THUGPro is you only have to do this ONCE. For previous “additions” such as this people got creative in their approach, but when relaunching THUGPro their work would get overwritten as the launcher checks for any files that have been changed. Not anymore! You can add soundtracks to your heart’s content and they will stay in place no matter how many times you open THUGPro. So, add to those Soundtracks and change it up each time you play if the mood suits you.
We hope you enjoy this new feature in THUGPro and have fun with it! If you have any questions or issues, be sure to post them in the comments below or stop by our Discord.
Thanks for reading and enjoying THUGPro with us…and remember…we out here!